边学边实战系列(四):ElasticSearch 索引管理
前面介绍了 ElasticSearch 基础概念、生态与应用场景、技术原理、安装和基础使用相关的知识点。今天我将详细的为大家介绍 ElasticSearch 索引管理相关知识,希望大家能够从中收获多多!
索引管理的引入
我们在前文中增加文档时,如下的语句会动态创建一个customer的index:
PUT /customer/_doc/1
{
  "name": "John Doe"
}
而这个index实际上已经自动创建了它里面的字段(name)的类型。我们不妨看下它自动创建的mapping:
{
  "mappings": {
    "_doc": {
      "properties": {
        "name": {
          "type": "text",
          "fields": {
            "keyword": {
              "type": "keyword",
              "ignore_above": 256
            }
          }
        }
      }
    }
  }
}
那么如果我们需要对这个建立索引的过程做更多的控制:比如想要确保这个索引有数量适中的主分片,并且在我们索引任何数据之前,分析器和映射已经被建立好。那么就会引入两点:第一个禁止自动创建索引,第二个是手动创建索引。
- 禁止自动创建索引
可以通过在 config/elasticsearch.yml 的每个节点下添加下面的配置:
action.auto_create_index: false
手动创建索引就是接下来文章的内容。
索引的格式
在请求体里面传入设置或类型映射,如下所示:
PUT /my_index
{
    "settings": { ... any settings ... },
    "mappings": {
        "properties": { ... any properties ... }
    }
}
- settings: 用来设置分片,副本等配置信息
- mappings: 字段映射,类型等
- properties: 由于type在后续版本中会被Deprecated, 所以无需被type嵌套
索引管理操作
我们通过kibana的devtool来学习索引的管理操作。
创建索引
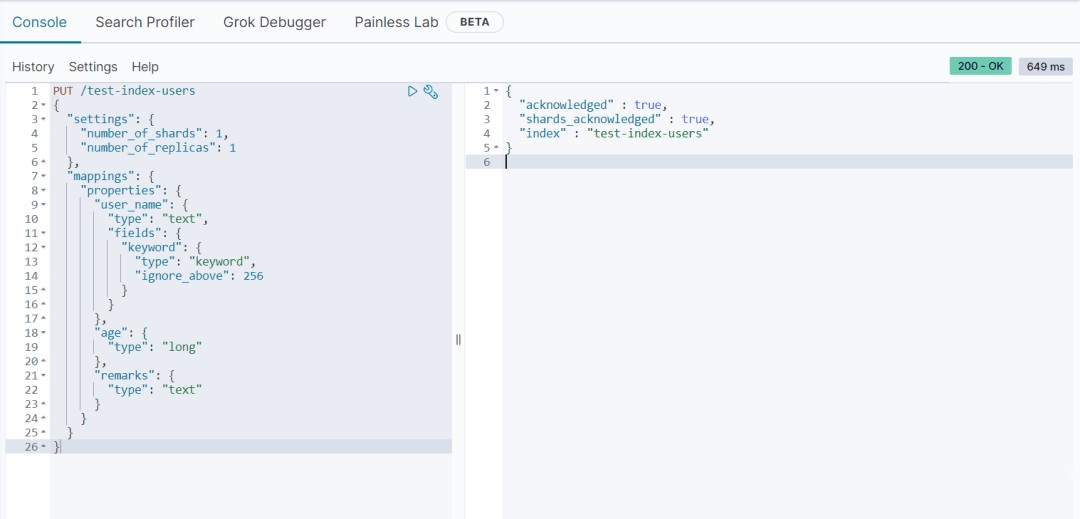
我们创建一个user 索引test-index-users,其中包含三个属性:name,age, remarks; 存储在一个分片一个副本上。
PUT /test-index-users
{
  "settings": {
  "number_of_shards": 1,
  "number_of_replicas": 1
 },
  "mappings": {
    "properties": {
      "name": {
        "type": "text",
        "fields": {
          "keyword": {
            "type": "keyword",
            "ignore_above": 256
          }
        }
      },
      "age": {
        "type": "long"
      },
      "remarks": {
        "type": "text"
      }
    }
  }
}
执行结果
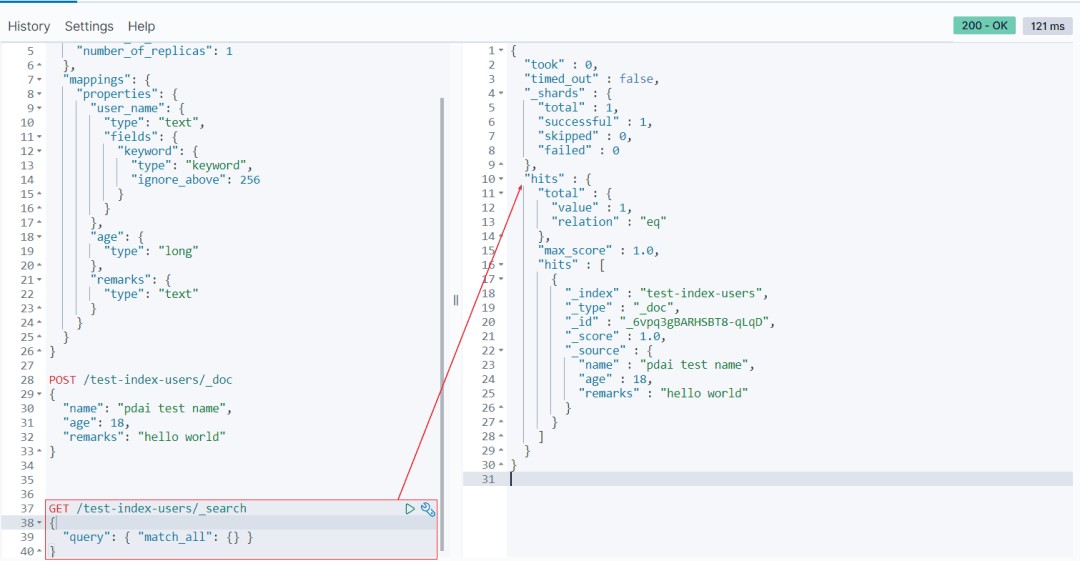
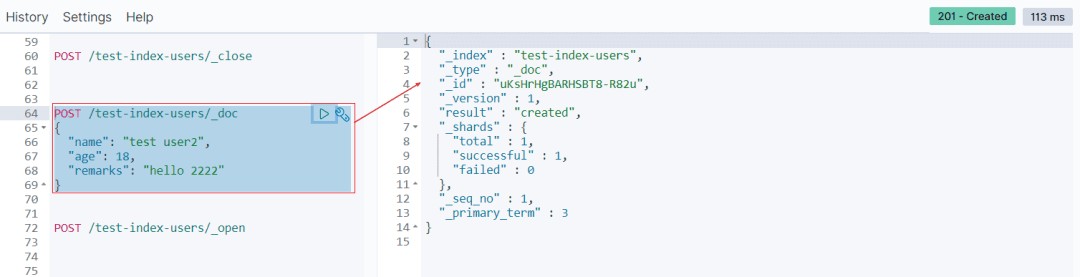
插入测试数据

查看数据
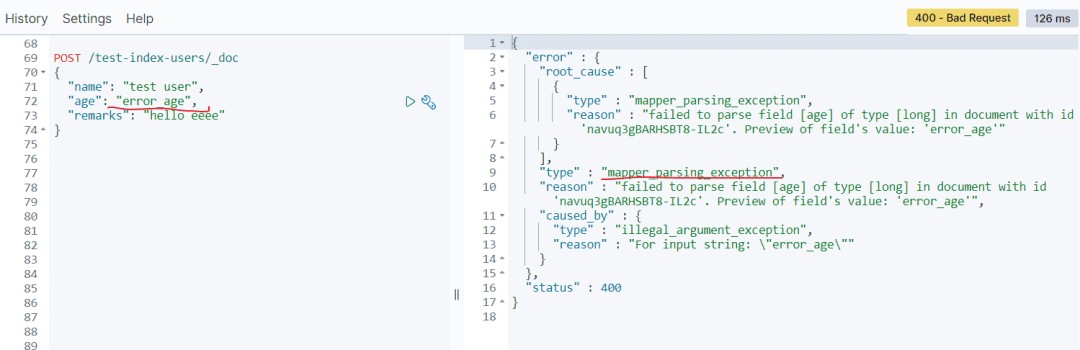
我们再测试下不匹配的数据类型(age):
POST /test-index-users/_doc
{
  "name": "test user",
  "age": "error_age",
  "remarks": "hello eeee"
}
你可以看到无法类型不匹配的错误:
修改索引
查看刚才的索引,curl 'localhost:9200/_cat/indices?v' | grep users
yellow open test-index-users LSaIB57XSC6uVtGQHoPYxQ 1 1 1 0 4.4kb 4.4kb
我们注意到刚创建的索引的状态是yellow的,因为我测试的环境是单点环境,无法创建副本,但是在上述number_of_replicas配置中设置了副本数是1;所以在这个时候我们需要修改索引的配置。
修改副本数量为0:
PUT /test-index-users/_settings
{
  "settings": {
    "number_of_replicas": 0
  }
}

再次查看状态:
green open test-index-users LSaIB57XSC6uVtGQHoPYxQ 1 1 1 0 4.4kb 4.4kb
打开/关闭索引
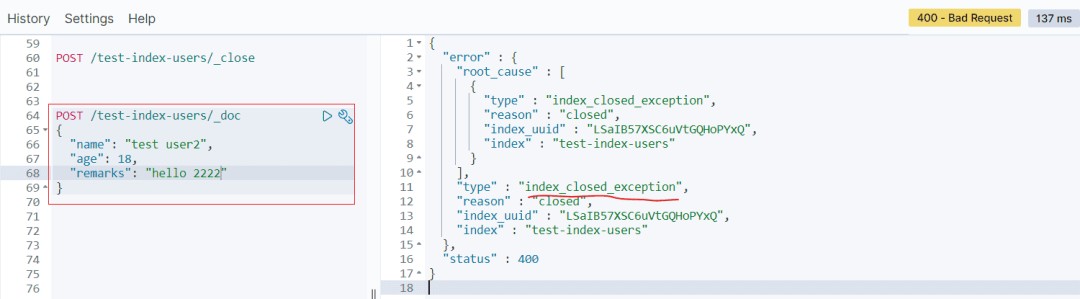
- 关闭索引
一旦索引被关闭,那么这个索引只能显示元数据信息,不能够进行读写操作。
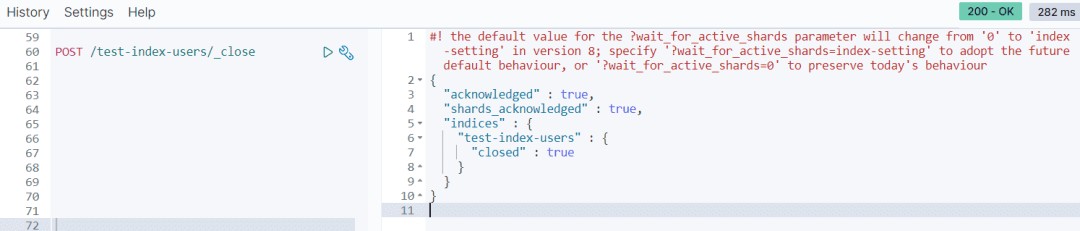
当关闭以后,再插入数据时:
打开索引
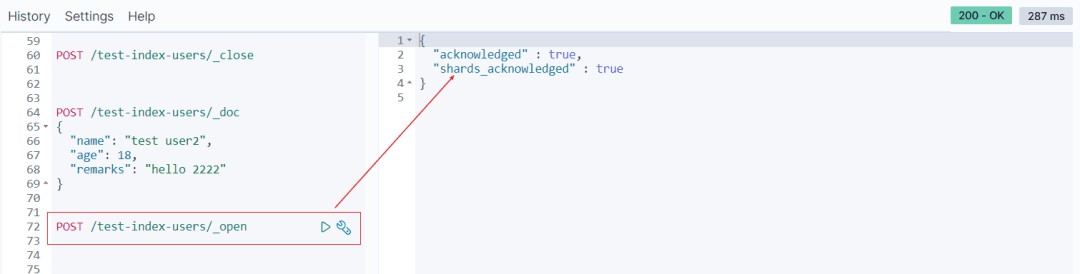
打开后又可以重新写数据了
删除索引
最后我们将创建的test-index-users删除。
DELETE /test-index-users

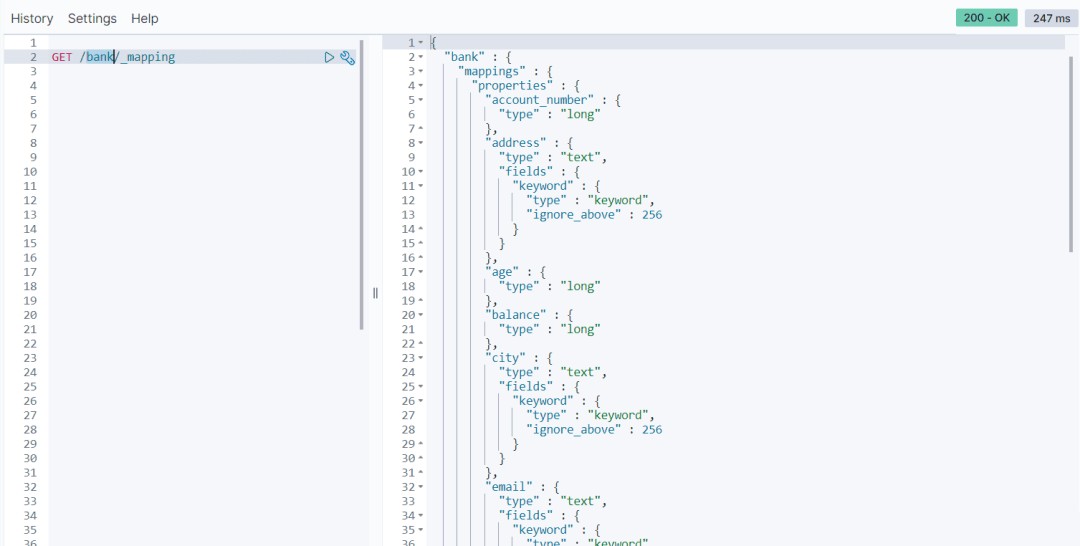
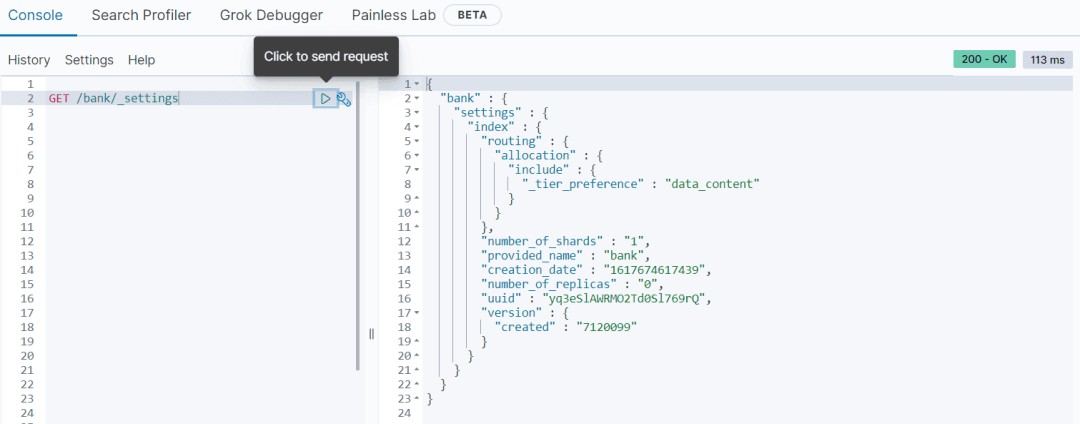
由于test-index-users被删除,所以我们看下之前bank的索引的信息。
- mapping
GET /bank/_mapping
- settings
GET /bank/_settings
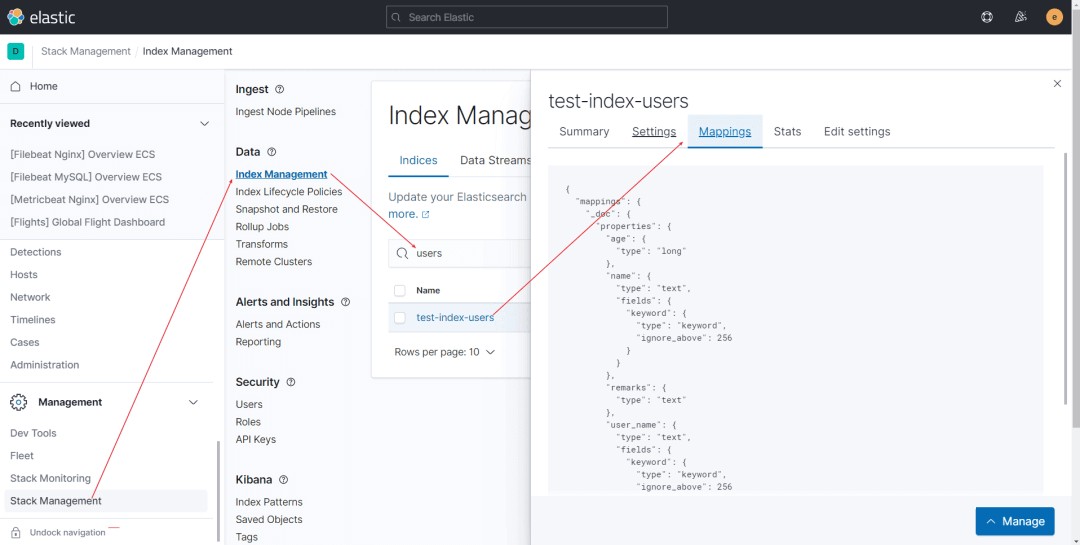
Kibana 管理索引
在Kibana如下路径,我们可以查看和管理索引
前文介绍了索引的一些操作,特别是手动创建索引,但是批量和脚本化必然需要提供一种模板方式快速构建和管理索引,这就是本文要介绍的索引模板(Index Template),它是一种告诉Elasticsearch在创建索引时如何配置索引的方法。为了更好的复用性,在7.8中还引入了组件模板。
索引模板
索引模板是一种告诉Elasticsearch在创建索引时如何配置索引的方法。
- 使用方式
在创建索引之前可以先配置模板,这样在创建索引(手动创建索引或通过对文档建立索引)时,模板设置将用作创建索引的基础。
模板类型
模板有两种类型:索引模板和组件模板。
- 组件模板是可重用的构建块,用于配置映射,设置和别名;它们不会直接应用于一组索引。
- 索引模板可以包含组件模板的集合,也可以直接指定设置,映射和别名。
索引模板中的优先级
- 可组合模板优先于旧模板。如果没有可组合模板匹配给定索引,则旧版模板可能仍匹配并被应用。
- 如果使用显式设置创建索引并且该索引也与索引模板匹配,则创建索引请求中的设置将优先于索引模板及其组件模板中指定的设置。
- 如果新数据流或索引与多个索引模板匹配,则使用优先级最高的索引模板。
内置索引模板
Elasticsearch具有内置索引模板,每个索引模板的优先级为100,适用于以下索引模式:
- logs-*-*
- metrics-*-*
- synthetics-*-*
所以在涉及内建索引模板时,要避免索引模式冲突。更多可以参考https://www.elastic.co/guide/en/elasticsearch/reference/current/index-templates.html。
案例
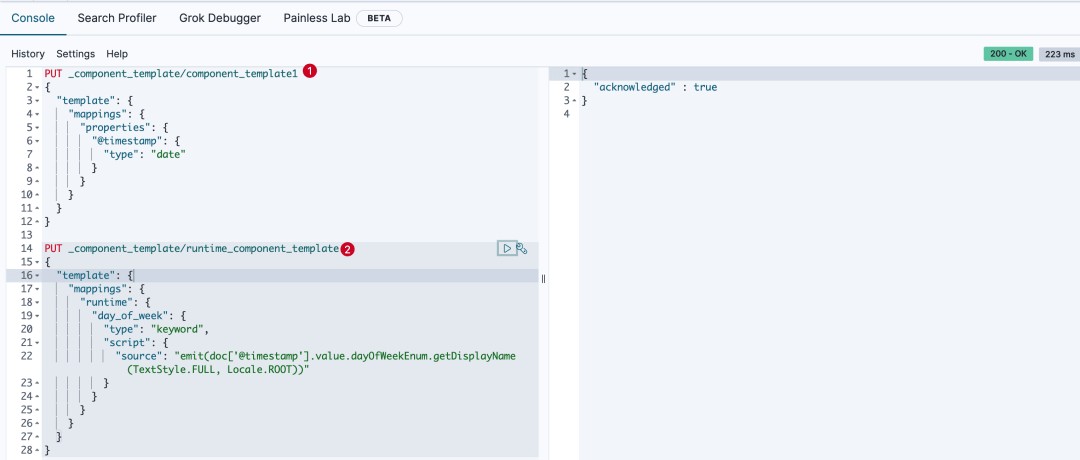
- 首先创建两个索引组件模板:
PUT _component_template/component_template1
{
  "template": {
    "mappings": {
      "properties": {
        "@timestamp": {
          "type": "date"
        }
      }
    }
  }
}

PUT _component_template/runtime_component_template
{
  "template": {
    "mappings": {
      "runtime": {
        "day_of_week": {
          "type": "keyword",
          "script": {
            "source": "emit(doc['@timestamp'].value.dayOfWeekEnum.getDisplayName(TextStyle.FULL, Locale.ROOT))"
          }
        }
      }
    }
  }
}
执行结果如下
- 创建使用组件模板的索引模板
PUT _index_template/template_1
{
  "index_patterns": ["bar*"],
  "template": {
    "settings": {
      "number_of_shards": 1
    },
    "mappings": {
      "_source": {
        "enabled": true
      },
      "properties": {
        "host_name": {
          "type": "keyword"
        },
        "created_at": {
          "type": "date",
          "format": "EEE MMM dd HH:mm:ss Z yyyy"
        }
      }
    },
    "aliases": {
      "mydata": { }
    }
  },
  "priority": 500,
  "composed_of": ["component_template1", "runtime_component_template"],
  "version": 3,
  "_meta": {
    "description": "my custom"
  }
}
执行结果如下
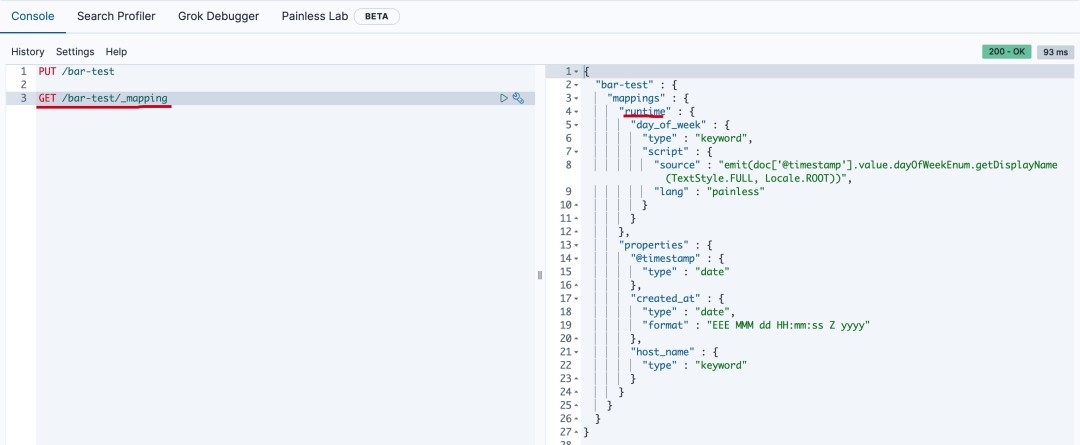
- 创建一个匹配bar*的索引bar-test
PUT /bar-test
然后获取mapping
GET /bar-test/_mapping
执行结果如下
模拟多组件模板
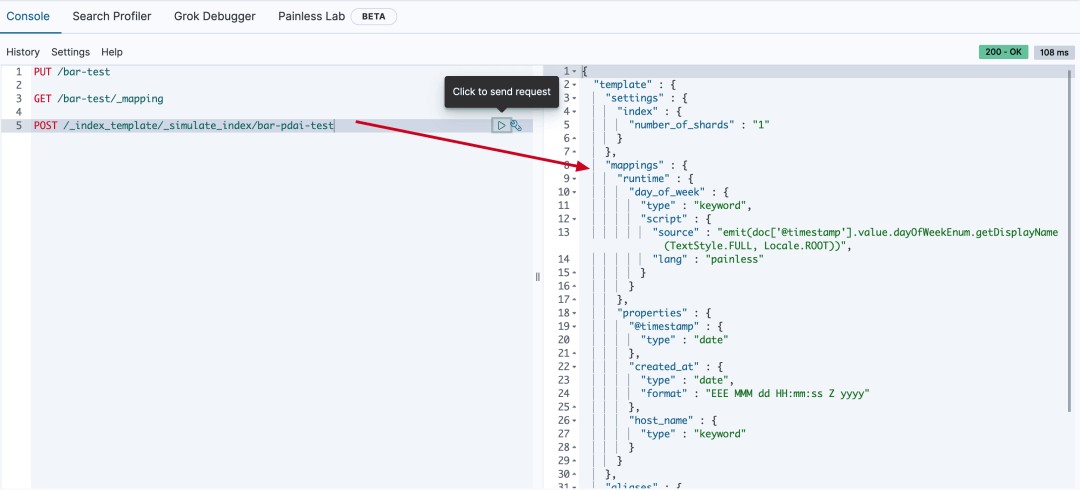
由于模板不仅可以由多个组件模板组成,还可以由索引模板自身组成;那么最终的索引设置将是什么呢?ElasticSearch设计者考虑到这个,提供了API进行模拟组合后的模板的配置。
模拟某个索引结果
比如上面的template_1, 我们不用创建bar*的索引(这里模拟bar-pdai-test),也可以模拟计算出索引的配置:
POST /_index_template/_simulate_index/bar-pdai-test
执行结果如下
模拟组件模板结果
当然,由于template_1模板是由两个组件模板组合的,我们也可以模拟出template_1被组合后的索引配置:
POST /_index_template/_simulate/template_1
执行结果如下:
{
  "template" : {
    "settings" : {
      "index" : {
        "number_of_shards" : "1"
      }
    },
    "mappings" : {
      "runtime" : {
        "day_of_week" : {
          "type" : "keyword",
          "script" : {
            "source" : "emit(doc['@timestamp'].value.dayOfWeekEnum.getDisplayName(TextStyle.FULL, Locale.ROOT))",
            "lang" : "painless"
          }
        }
      },
      "properties" : {
        "@timestamp" : {
          "type" : "date"
        },
        "created_at" : {
          "type" : "date",
          "format" : "EEE MMM dd HH:mm:ss Z yyyy"
        },
        "host_name" : {
          "type" : "keyword"
        }
      }
    },
    "aliases" : {
      "mydata" : { }
    }
  },
  "overlapping" : [ ]
}
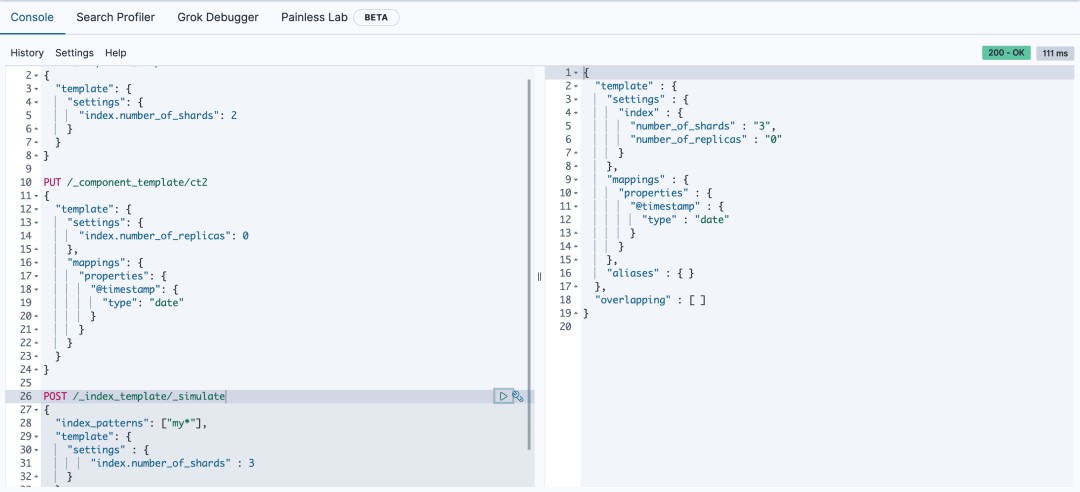
模拟组件模板和自身模板结合后的结果
- 新建两个模板
PUT /_component_template/ct1
{
  "template": {
    "settings": {
      "index.number_of_shards": 2
    }
  }
}

PUT /_component_template/ct2
{
  "template": {
    "settings": {
      "index.number_of_replicas": 0
    },
    "mappings": {
      "properties": {
        "@timestamp": {
          "type": "date"
        }
      }
    }
  }
}
模拟在两个组件模板的基础上,添加自身模板的配置
POST /_index_template/_simulate
{
  "index_patterns": ["my*"],
  "template": {
    "settings" : {
        "index.number_of_shards" : 3
    }
  },
  "composed_of": ["ct1", "ct2"]
}
执行的结果如下
{
  "template" : {
    "settings" : {
      "index" : {
        "number_of_shards" : "3",
        "number_of_replicas" : "0"
      }
    },
    "mappings" : {
      "properties" : {
        "@timestamp" : {
          "type" : "date"
        }
      }
    },
    "aliases" : { }
  },
  "overlapping" : [ ]
}
- 发表于 2023-06-16 11:20
- 阅读 ( 37 )
