Pgbouncer最佳实践 之 部署篇
《Pgbouncer最佳实践》系列已经连载到了第四篇,概念篇介绍了数据库连接池在Pgbouncer中的三种方式。为什么使用连接池,使用与不使用之间的性能差异,以及连接池模式的工作流程、细节及一些注意事项等内容。性能提升篇介绍了Pgbouncer带来的性能提升的相关测试。池模式篇详细介绍事务池、会话池和语句池。
第四篇,将为大家介绍Pgbouncer的部署形式和用户密码认证方式。
第一部分 Pgbouncer部署形式
Pgbouncer的部署形式,包括单应用场景、多应用场景、集群场景还有多实例场景,这些方式都是依据不同的业务场景,没有孰优孰劣,符合的才是对的。其中单应用和多应用场景来源于官方。
01单应用场景
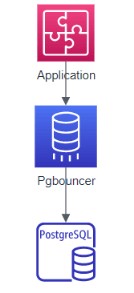
图 1 单应用多连接场景结构图
单应用场景主要具体为短连接较多的场景,频繁进行数据库的连接操作,但操作时间较短,均为短连接,所以将pgbouncer于应用服务器部署在同一台服务器,减少应用服务器和pgbouncer之间的开销。
配置文件
[databases]
test1 =
test =
[pgbouncer]
listen_port = 6688
listen_addr = 192.168.165.3
auth_type = md5
auth_file = /home/postgres/pgbouncer/bin/userlist.txt
logfile = /home/postgres/pgbouncer/pgbouncer1.log
pidfile =/home/postgres/pgbouncer/pgbouncer1.pid
unix_socket_dir = /tmp
;;unix_socket_mode = 0777
admin_users = wzb
stats_users = wzb
pool_mode = session
max_client_conn=1000
default_pool_size=30
导出数据库中用户名及密码到userslist.txt
userslist.txt,格式为用户名 密码
"testuser" "md54d15115d8bebd3188c1ae09c4a9848af"
"testuser1" "md5f8386abbae413786661ee5a5cfb5593c"
"wzb" "md53d57c4bc9a647385e6916efd0b44db46"
启动Pgbouncer
pgbouncer -d pgbouncer.ini
客户端连接方式
psql -dtest1 -Utestuser1 -p6688
02多应用场景
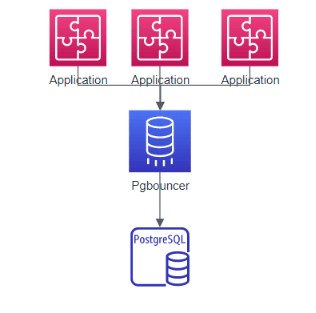
图 2 多应用场景结构图
多应用场景,一般指多个应用服务器连接数据库,因此可以选择将pgbouncer与数据库服务部署在同一台服务器上,减少pgbouncer和数据库之间的开销。
配置PgBouncer.ini文件
[databases]
a1 =  host=127.0.0.1 port=5432 dbname=test
a2 =  host=127.0.0.1 port=5432 dbname=test1
[pgbouncer]
listen_port = 6688
listen_addr = *
auth_type = md5
auth_file = /home/postgres/pgbouncer/bin/userlist.txt
logfile = /home/postgres/pgbouncer/pgbouncer.log
pidfile =/home/postgres/pgbouncer/pgbouncer.pid
admin_users = wzb
stats_users = wzb
pool_mode = session
max_client_conn=1000
default_pool_size=30
导出数据库中用户名及密码到userslist.txt
userslist.txt,格式为用户名 密码
"testuser" "md54d15115d8bebd3188c1ae09c4a9848af"
"testuser1" "md5f8386abbae413786661ee5a5cfb5593c"
"wzb" "md53d57c4bc9a647385e6916efd0b44db46"
启动Pgbouncer
pgbouncer -d pgbouncer.ini
连接后端数据库
$ psql -p 6688 -U testuser a1
$ psql -p 6688 -U testuser1 a2
连接pgbouncer数据库
psql -p 6688 pgbouncer -U wzb
pgbouncer=# show help;
NOTICE: Console usage
DETAIL:
SHOW HELP|CONFIG|DATABASES|POOLS|CLIENTS|SERVERS|USERS|VERSION SHOW FDS|SOCKETS|ACTIVE_SOCKETS|LISTS|MEM SHOW DNS_HOSTS|DNS_ZONES SHOW STATS|STATS_TOTALS|STATS_AVERAGES|TOTALS SET key = arg RELOAD PAUSE [<db>] RESUME [<db>] DISABLE <db> ENABLE <db> RECONNECT [<db>] KILL <db> SUSPEND SHUTDOWN SHOW pgbouncer=# show clients;
type| C
user| pgbouncer
database| pgbouncer
state| active
addr| unix
port| 6432
local_addr| unix
local_port| 6432
connect_time| 2020-10-09 20:41:32 CST
request_time| 2020-10-09 20:41:32 CST
wait| 5
wait_us| 483185
close_needed| 0
ptr| 0x9ec340
link|
remote_pid| 23567
tls |
pgbouncer=# show pools;
database| pgbouncer
user| pgbouncer
cl_active| 1
cl_waiting| 0
sv_active|0
sv_idle|0
sv_used|0
sv_tested|0
sv_login|0
maxwait|0
maxwait_us|0
pool_mode|  transaction
03集群场景(读写分离)
读写分离场景下pgbouncer的配置与前面配置基本一致,主要区别于要针对读和写进行分别部署pgbouncer,因为pgbouncer本身只是数据库连接池,不具备负载均衡,或高可用,IP漂移等特性,需要结合其他成熟产品进行组合使用。
04多实例场景
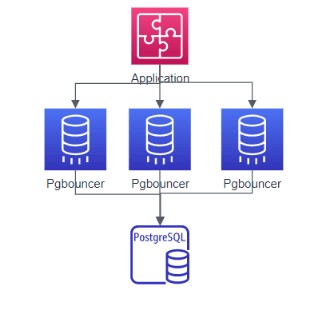
图 3 多实例场景结构图
多实例场景主要利用linux系统端口重用技术,这个特性依靠Linux内核上的支持(Linux3.6以上版本),并结合pgbouncer自身支持(设置so_reuseport=1)结合起来形成多实例场景下的pgbouncer使用,可以认为是pgbouncer的高可靠或者高可用,在某一个实例进程故障的情况下,其他实例集成仍然可以处理来自外部的数据库连接请求。从操作系统层面来看,属于多进程共享同一个端口。
实例配置1
[databases]
a2 =  host=127.0.0.1 port=5432 dbname=test1 pool_size=50
;;a1 =  host=127.0.0.1 port=5432 dbname=test pool_size=30
[pgbouncer]
listen_port = 6688
listen_addr = 192.168.165.3
auth_type = md5
auth_file = /home/postgres/pgbouncer/bin/userlist.txt
logfile = /home/postgres/pgbouncer/pgbouncer1.log
pidfile =/home/postgres/pgbouncer/pgbouncer1.pid
unix_socket_dir = /tmp/pg1
#unix_socket_mode = 0777
admin_users = wzb
stats_users = wzb
pool_mode = session
max_client_conn=1000
default_pool_size=30
so_reuseport = 1
实例配置2
[databases]
a2 =  host=127.0.0.1 port=5432 dbname=test1 pool_size=50
;;a1 =  host=127.0.0.1 port=5432 dbname=test pool_size=30
[pgbouncer]
listen_port = 6688
listen_addr = 192.168.165.3
auth_type = md5
auth_file = /home/postgres/pgbouncer/bin/userlist.txt
logfile = /home/postgres/pgbouncer/pgbouncer2.log
pidfile =/home/postgres/pgbouncer/pgbouncer2.pid
unix_socket_dir = /tmp/pg2
#unix_socket_mode = 0777
admin_users = wzb
stats_users = wzb
pool_mode = session
max_client_conn=1000
default_pool_size=30
so_reuseport = 1
导出数据库中用户名及密码到userslist.txt
userslist.txt,格式为用户名 密码
"testuser" "md54d15115d8bebd3188c1ae09c4a9848af"
"testuser1" "md5f8386abbae413786661ee5a5cfb5593c"
"wzb" "md53d57c4bc9a647385e6916efd0b44db46"
启动多实例
./pgbouncer pgbouncer.ini
./pgbouncer pgbouncer1.ini
第二部分 用户名密码认证方式
最后,再为大家介绍一下pgboucner中用户名密码认证方式。
01pgbouncer 用户名密码认证相关配置项
Pgbouncer.ini 配置文件中和用户认证相关的部分如下,
[pgbouncer]
auth_type = md5
auth_file = /etc/pgbouncer/userlist.txt
auth_user = pgbouncer
auth_query = SELECT p_user, p_password FROM ...
auth_type 用认证方式,包含:pam, hba, cert, md5, scram-sha-256, plain, trust, any.
auth_file 包含用户名及密码的文件名。
auth_query 当client connection中的用户名及密码在auth_file中查找不到时,pgbouncer 可以执行auth_query , 从数据库中获取对应的密码。
auth_user 是做auth_query 时使用的用户名。auth_user的密码可以从auth_file中获取。
02Pgbouncer 是怎么获取用户名密码来认证客户端的连接呢?
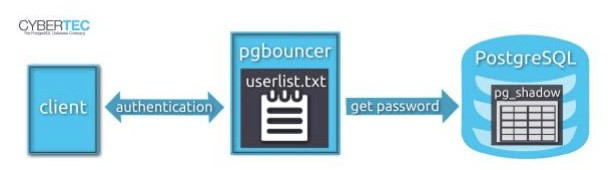
有两种方式:
1:通过auth_file
2:通过数据库中获取
首先根据用户名在auth_file 中查找对应的密码,来认证client connection,如果在auth_file 中找不到对应的用户名密码,则通过执行auth_query 到数据库中查找对应的密码。
如果用户名密码变更频繁,使用auth_file的话,需要经常更新它,并让pgbouncer重新加载新的配置文件,非常麻烦。这种情况下建议使用” auth_user” 和 “auth_query” 获取用户名密码。
03Pgbouncer 连接数据库时的用户名密码从哪里获取?
有三种方式:
1) 配置文件中
2) auth_file
3) auth_query
用户名:
如果对应的数据库配置中包含了用户名,则pgbouncer连接数据库时使用该用户名。
否则,使用客户端登录时的用户名去连接数据库。
密码:
同样,如果对应的数据库配置中包含了密码,则pgbouncer连接数据时候使用该密码,否则,使用通过auth_file 和 auth_query 来获取密码。
如下pgbouncer.ini例子,
[databases]
; redirect bardb to bazdb on localhost
P0 = host=127.0.0.1 port=300 dbname=bazdb
; access to destination database will go with single user
forcedb1 = host=127.0.0.1 port=300 user=baz client_encoding=UNICODE datestyle=ISO
forcedb2 = host=127.0.0.1 port=300 user=baz password=foo client_encoding=UNICODE datestyle=ISO
当pgbouncer 连接database P0的时候, 配置文件中不包含对应的用户名密码,pgbouncer则从 client connection中获取用户名密码。
当pgbouncer 连接forcedb1 时, 使用”baz” 用户名,密码通过auth_file 或者auth_query获取。
当pgbouncer 连接forcedb2时, 则直接使用配置中的用户名和密码。
参考
[1]Pgbouncer官网
[2]PgBouncer Configuration
[3]Tuning PostgreSQL for sysbench-tpcc
[4]understanding-user-management-in-pgbouncer
[5]performance-best-practices-for-using-azure-database-for-postgresql-connection-pooling
[6]guide-using-pgbouncer
[7]azure-database-for-postgresql/connection-handling-best-practice-with-postgresql
[8]steps-to-install-and-setup-pgbouncer-connection-pooling-proxy
[9]pg-phriday-securing-pgbouncer
- 发表于 2022-02-27 23:46
- 阅读 ( 32 )
