jitsi 安装配置
安装文档连接:https://jitsi.github.io/handbook/docs/devops-guide/devops-guide-manual
jitsi架构如图:
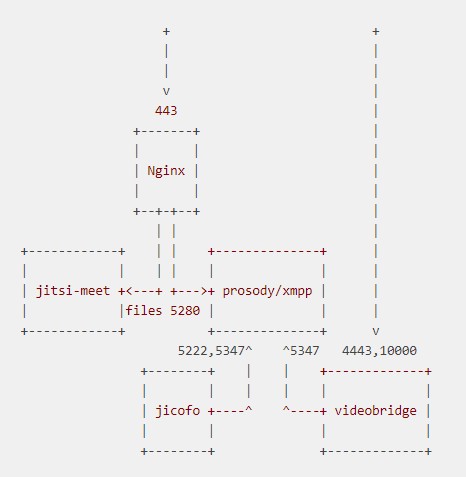
使用官方推荐的源安装方式配置文件都在 /etc/jitsi 下
其中 /etc/jitsi/conference.sthmei.com-config.js 文件在nginx 站点配置下,被alias config.js 文件
/etc/jitsi/jicofo/config 为jicofo的启动文件使用到,jicofo的启动文件位于:/etc/init.d/jicofo
/etc/jitsi/videobridge/config 为/lib/systemd/system/jitsi-videobridge.service 文件使用, 通过EnvironmentFile 来定义 启动用到在变量
RuntimeDirectory 启动定义在目录会在/run 下创建,停止会自动删除,RuntimeDirectoryMod 定义目录权限。
/etc/jitsi/videobridge/sip-communicator.properties 最关键是定义 nat 后面内网肯外网ip
/etc/prosody 目录定义 xmpp 的配置和私有证书生成
/etc/prosody/certs 私有证书生成目录 ,在通过prosodyctl 生成私有证书之前,需要配置好,/etc/prosody/conf.avail/conference.sthmei.com.cfg.lua 里面域名,否则
不能通过prosodyctl 生成内部私有证书。在/etc/prosody/conf.avail/conference.sthmei.com.cfg.lua 中定义域名 conference.sthmei.com和auth.conference.sthmei.com
并配置YOURSECRET YOURSECRE2,
/etc/prosody/conf.d 主要是 /etc/prosody/config.avail 下文件软连
以上配置好后,可以通过
prosodyctl cert generate conference.sthmei.com prosodyctl cert generate auth.conference.sthmei.com
会生成对应域名的私有公钥和私钥,注意生成的证书有效期为1年,一定接得及时更新证书哦
生成的私有公钥不被linux系统的根证书承认,需要导入根证书中
ln -sf /var/lib/prosody/auth.jitsi.example.com.crt /usr/local/share/ca-certificates/auth.jitsi.example.com.crt
update-ca-certificates -f
然后根据模板配置nginx服务器,最后启动即可
systemctl start jitsi-videobridge
systemctl start jicofo
prosodyctl start
systemctl start nginx
- 发表于 2020-05-27 04:38
- 阅读 ( 58 )
