consul 开启acl的群集部署
1,部署机器列表如下:

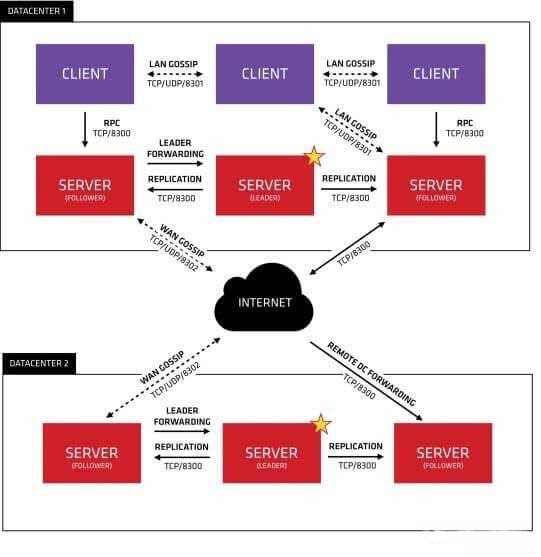
其中 192.168.1.77 192.168.1.229 192.168.1.162 部署server agent 192.168.1.22 部署client agent ,client agent 和server agent区别是,client不保存catalog数据,client通过RPC(8300)端口和server沟通,server (如果是follower)把数据转发给leader,然后leader 通过raft协议同步数据到follower,实现数据一致性。consul 设计为 反熵模式,正常要求注册服务通过client agent 到server agent上,其实不需要client agent也可以直接注册到server agent上,这有违consul 反熵设计模式。 consul 群集架构图如下:
2 创建consul 数据目录和日志目录
mkdir -p /webdata/opt/local/consul/{data,log}
server1.json (ip:192.168.1.77)配置如下:
{
"datacenter":"dc1",
"primary_datacenter":"dc1",
"retry_join":[
"192.168.1.77",
"192.168.1.229",
"192.168.1.162"
],
"advertise_addr": "192.168.1.77",
"bind_addr": "192.168.1.77",
"server":true,
"node_name":"consul-server1",
"data_dir":"/webdata/opt/local/consul/data",
"enable_script_checks":true,
"enable_local_script_checks":true,
"log_file":"/webdata/opt/local/consul/log/",
"log_level":"info",
"log_rotate_bytes":100000000,
"log_rotate_duration":"24h",
"acl":{
"enabled":true,
"default_policy":"deny",
"enable_token_persistence":true,
"tokens":{
"agent":"69d1660c-af76-0613-a888-a779927ab5cc"
}
}
}
server2.json (ip:192.168.1.229) 配置如下:
{
"datacenter":"dc1",
"primary_datacenter":"dc1",
"advertise_addr": "192.168.1.229",
"bind_addr": "192.168.1.229",
"retry_join":[
"192.168.1.162",
"192.168.1.77",
"192.168.1.229"
],
"server":true,
"node_name":"consul-server2",
"data_dir":"/webdata/opt/local/consul/data",
"enable_script_checks":true,
"enable_local_script_checks":true,
"log_file":"/webdata/opt/local/consul/log/",
"log_level":"info",
"log_rotate_bytes":100000000,
"log_rotate_duration":"24h",
"acl":{
"enabled":true,
"default_policy":"deny",
"enable_token_persistence":true,
"tokens":{
"agent":"69d1660c-af76-0613-a888-a779927ab5cc"
}
}
}
server3.json (ip:192.168.1.162) 配置如下:
{
"datacenter":"dc1",
"primary_datacenter":"dc1",
"advertise_addr": "192.168.1.162",
"bind_addr": "192.168.1162",
"retry_join":[
"192.168.1.162",
"192.168.1.77",
"192.168.1.229"
],
"server":true,
"node_name":"consul-server3",
"data_dir":"/webdata/opt/local/consul/data",
"enable_script_checks":true,
"enable_local_script_checks":true,
"log_file":"/webdata/opt/local/consul/log/",
"log_level":"info",
"log_rotate_bytes":100000000,
"log_rotate_duration":"24h",
"acl":{
"enabled":true,
"default_policy":"deny",
"enable_token_persistence":true,
"tokens":{
"agent":"69d1660c-af76-0613-a888-a779927ab5cc"
}
}
}
client.json (ip:192.168.1.22) 配置如下:
{
"datacenter":"dc1",
"primary_datacenter":"dc1",
"advertise_addr": "192.168.1.22",
"retry_join":[
"192.168.1.77",
"192.168.1.229",
"192.168.1.162"
],
"bind_addr":"192.168.1.22",
"node_name":"consul-client1",
"client_addr":"0.0.0.0",
"data_dir":"/webdata/opt/local/consul/data",
"log_file":"/webdata/opt/local/consul/log",
"log_level":"DEBUG",
"log_rotate_bytes":100000000,
"log_rotate_duration":"24h",
"ui":true,
"enable_script_checks":true,
"enable_local_script_checks":true,
"disable_remote_exec":true,
"acl":{
"enabled":true,
"default_policy":"deny",
"enable_token_persistence":true,
"tokens":{
"agent":"69d1660c-af76-0613-a888-a779927ab5cc"
}
}
}
可以看到client模式和server模式区别不大, "server":true 如果现实指定,则为server agent,指定为false或不指定则为client agent, 这里client agent 上开启了ui,即web端口,如果ui 不开启,则虽然 8500 端口工作在tcp 状态,此时如果通过nginx代理则打不开页面。
上面几个参数说明下:
primary_datacenter 开启acl情况下,作为授权中心。
advertise_addr 默认为bind_addrs ,如果agent在不同网段,此时bind_addrs 和advertise_addr 是不同的,此时的advertise_addrs 应该为路由网关地址
enable_token_persistence 指token可以保存本地硬盘
token有几种不同情况:
开启acl,通过 consul acl bootstrap 命令会生成连个token一个是管理token,

即所谓master-token 拥有所有权限,主要用来访问agent endpoint ,主要指consul members ,consul join,consul leave,consule acl 等等调用的http API(https://www.consul.io/api/agent.html) 这个另外一个是匿名token,默认情况,没有绑定任何policy所以不能访问任何服务器和node,。
以上两个token是系统内置,不能删除,单可以update,它们 id(uuid) 一个是01 一个是02
除了上面两个还有default token,可以通过 consul acl set-agent-token default token-id 来设置。 用来服务之间操作,api接口和dns api查询等,如果默认token没有提供,则使用匿名token
agent token 用户client和server server和server直接通讯。server之间的policy 的node 需要有write,service只需要read,单client 的node 两则都需要write权限
如果agent不提供,会使用default agent
3 启动服务
服务agent
sudo consul agent -config-file /webdata/opt/local/consul/server1.json &
sudo consul agent -config-file /webdata/opt/local/consul/server2.json &
sudo consul agent -config-file /webdata/opt/local/consul/server3.json &
客户agent
sudo consul agent -config-file /webdata/opt/local/consul/client1.json &
启动后,会自动选取leader 可以通过 curl -sS http://127.0.0.1:8500/v1/agent/status/leader -token=查看选取的leader
此时 如果通过 consul members 查看,是没有任何显示,因为通过acl 过滤了

此时可以修改 匿名token 绑定一个可以读取的节点和服务器的policy,另外一个是通过每天机器配置默认token。
生成policy和role可以使用ui界面,非常直观,当然可以使用命令。
编写agent.hcl 文件
node_prefix "" {
policy = "write"
}
service_prefix "" {
policy = "write"
}
通过
consul acl policy create -name "agent-policy" -description "agent-syn-policy" -datacenter "dc1" -rules @agent.hcl 创建名字为 agent-policy 的策略
然后创建token绑定刚才的policy
consul acl token create -description "agent token" -policy-name "agent-policy"
4,创建服务
上面token生成和应用后,如果绑定默认token 查询consul members时候不需要再输入-token=.tokenID 了,
下面我们向consul注册服务。
也有两种方式,
1,定义注册服务,带services 数组形式:保存 web.json放到配置文件指定(data_dir)下,然后通过consul reload 注册
{
"services": [{
"id": "tengine",
"name": "web",
"address": "172.16.42.97",
"port": 80,
"Tags": ["web-server"],
"enable_tag_override": false,
"check": {
"deregisterCriticalServiceAfter": "30m",
"http": "http://127.0.0.1",
"interval": "5s"
}
} ]
}
2,编写nginx.json可以放到任何目录下(建议两种方式只使用一种使用)相比上面,去掉了,services: [{ }]
{
"id": "tengine",
"name": "web",
"address": "172.16.42.97",
"port": 80,
"Tags": ["web-server"],
"enable_tag_override": false,
"check": {
"deregisterCriticalServiceAfter": "30m",
"http": "http://127.0.0.1",
"interval": "5s"
}
}
然后通过请求:
curl -X PUT -d @nginx.json http://127.0.0.1:8500/v1/agent/service/register?token=tokenID 完成注册服务
服务注册完成后,可以在ui界面看到。
可以通过 curl -sS http://127.0.0.1:8500/v1/catalog/service/order_service -token=tokenID (这种不认,还是提示权限问题)
curl -X PUT -d @web.json http://127.0.0.1:8500/v1/agent/service/register?token=ef026394-e527-83e4-abe4-84130fd414ce (通过)
后面传的token,对服务有写的权限即可
或
dig @127.0.0.1 -p 8600 order_service.service.consul
因为 consul dns API 不是传递参数,所以,直接通过 修改匿名token或 设置默认token来实现
- 发表于 2020-02-10 01:22
- 阅读 ( 49 )
