MySQL高可用工具Orchestrator系列
MySQL高可用工具Orchestrator系列一:单节点模式安装
背 景
MySQL高可用方案有很多种,常见的有:keepalived、MHA、Galera、MGR、Orchestrator、replication-manager等。本系列将介绍在GitHub被使用的Orchestrator方案。本篇文章先介绍最基础的单节点模式的安装。
环 境orchestrator机器:10.10.30.146orchestrator后端元数据库MySQL:10.10.30.146
目标监控数据库:10.10.30.129:3306
安装orchestrator元数据库MySQL安装MySQL的步骤省略,和常规安装MySQL一样。
安装完成后创建orchestrator需要用到的库和用户。
CREATE DATABASE IF NOT EXISTS orchestrator;
CREATE USER 'orchestrator'@'127.0.0.1' IDENTIFIED BY 'orchestrator';
GRANT ALL PRIVILEGES ON `orchestrator`.* TO 'orchestrator'@'127.0.0.1';
这里元数据库MySQL和orchestrator在同一台机器上,所以创建账号的时候用的'127.0.0.1',如果不在同一台机器上,将IP换成orchestrator所在机器ip。
密码按需修改。 安装orchestrator下载orchestrator安装包,这里用的是orchestrator-3.1.0-linux-amd64.tar.gz。
https://github.com/github/orchestrator/releases解压orchestrator安装包。
tar -xvzf orchestrator-3.1.0-linux-amd64.tar.gz -C /
将/usr/local/orchestrator/orchestrator-sample.conf.json移动到/etc下,并命名为orchestrator.conf.json。
[root@10-10-30-146 orchestrator]# ls
orchestrator orchestrator-sample-sqlite.conf.json orchestrator-sample.conf.json resources
[root@10-10-30-146 orchestrator]# cp orchestrator-sample.conf.json /etc/orchestrator.conf.json
目标监控数据库授权在需要监控的目标数据库上进行授权。这里目标数据库是:10.10.30.129:3306
CREATE USER 'orchestrator'@'orch_host' IDENTIFIED BY 'orch_topology_password';
GRANT SUPER, PROCESS, REPLICATION SLAVE, RELOAD ON *.* TO 'orchestrator'@'orch_host';
GRANT SELECT ON mysql.slave_master_info TO 'orchestrator'@'orch_host';
GRANT SELECT ON ndbinfo.processes TO 'orchestrator'@'orch_host'; -- Only for NDB Cluster
其中,将'orch_host' 改成对应orch所在服务器的ip,'orch_topology_password'改成合适的密码。这里orch_host是10.10.30.146,将密码改为orchestrator。 修改orchestrator配置文件修改/etc/orchestrator.conf.json如下:
/// 配置orchestrator后端元数据库信息
...
"MySQLOrchestratorHost": "127.0.0.1",
"MySQLOrchestratorPort": 3306,
"MySQLOrchestratorDatabase": "orchestrator",
"MySQLOrchestratorUser": "orchestrator",
"MySQLOrchestratorPassword": "orchestrator",
...
/// 配置orchestrator监控的目标数据库信息
"MySQLTopologyUser": "orchestrator",
"MySQLTopologyPassword": "orchestrator",
启动orchestrator
cd /usr/local/orchestrator && ./orchestrator --config=/etc/orchestrator.conf.json http &
web端访问地址10.10.30.146:3000。页面效果如下:
MySQL高可用工具Orchestrator系列二:复制拓扑的发现
给定实例,如何发现自己
这里涉及到两个参数:HostnameResolveMethod、MySQLHostnameResolveMethod
HostnameResolveMethod有三个选项:"cname"、"default"、"none"
- cname:通过CNAME做域名解析(resolve hostname)
- default:不做特别的解析, no special resolving via net protocols
- none:do nothing
MySQLHostnameResolveMethod有三个选项:"@@hostname"、"@@report_host"、""
- @@hostname: select @@hostname
- @@report_host: select @@report_host
- "": do nothing
这里会有一个问题需要注意:假设生产环境存在两台数据库服务器主机名一样,比如都是localhost.localdomain;并且,orch配置参数HostnameResolveMethod使用了默认的"default"、MySQLHostnameResolveMethod使用了默认的"@@hostname"。那么,orch在查找的时候,会将用户输入的IP地址解析成hostname,但因为存在两台hostname一样的机器,所以可能会导致出错,即orch找不到正确的那台服务器。
因此,最好保证线上环境,不同服务器的主机名都不同。
给定主库,如何发现从库
由参数DiscoverByShowSlaveHosts控制。
如果为true,则会尝试先通过show slave hosts命令去发现从库。此时会有三种情况。
从库设置了正确的report_host,show slave hosts中的host字段显示正确的IP,则直接通过show slave hosts发现从库。
- 从库设置了错误的report_host,show slave hosts中的host字段显示错误的IP,则orchestrator找不到从库。
- 如果IP ping不通,则报如下信息:
[mysql] 2019/10/29 17:57:24 driver.go:81: net.Error from Dial()': dial tcp 10.10.30.222:3306: i/o timeout
[mysql] 2019/10/29 17:57:25 driver.go:81: net.Error from Dial()': dial tcp 10.10.30.222:3306: i/o timeout
[mysql] 2019/10/29 17:57:26 driver.go:81: net.Error from Dial()': dial tcp 10.10.30.222:3306: i/o timeout
2019-10-29 17:57:26 ERROR driver: bad connection
- 如果IP ping的通,则可能报如下信息:
2019-10-29 18:15:34 ERROR dial tcp 10.10.30.228:3306: connect: connection refused
2019-10-29 18:15:40 ERROR dial tcp 10.10.30.228:3306: connect: connection refused
2019-10-29 18:15:46 ERROR dial tcp 10.10.30.228:3306: connect: connection refused
2019-10-29 18:15:52 ERROR dial tcp 10.10.30.228:3306: connect: connection refused
// 或者
2019-10-29 18:11:11 ERROR Error 1045: Access denied for user 'orchestrator'@'10.10.30.146' (using password: YES)
WARNING: NamedStopwatch.Stop("instance") IsRunning is false
2019-10-29 18:11:17 ERROR Error 1045: Access denied for user 'orchestrator'@'10.10.30.146' (using password: YES)
WARNING: NamedStopwatch.Stop("instance") IsRunning is false
从库没有设置report_host,show slave hosts中的host字段显示为空,则通过processlist发现从库。
- 此时,会报如下信息:
2019-08-06 18:12:49 ERROR ReadTopologyInstance(10.10.30.129:3306) show slave hosts: ReadTopologyInstance(10.10.30.129:3306) 'show slave hosts' returned row with <host,port>: <,3306>
如果为false,则通过information_schema.processlist去发现从库。
select substring_index(host, ':', 1) as slave_hostname from information_schema.processlist where command IN ('Binlog Dump', 'Binlog Dump GTID');
给定从库,如何发现主库
通过show slave status命令去发现主库。
DiscoveryByShowSlaveHosts意义
既然show slave status命令显示的host不一定准确,那为什么还要加入DiscoverByShowSlaveHosts这个参数呢?
这个有几种原因:首先,MaxScale不支持PROCESSLIST,因此SHOW SLAVE HOSTS是唯一的选择。
更重要的是,如果只是通过information_schema.processlist去发现从库,master无法知道replica监听的是哪个端口。show processlist只会显示复制进程使用的套接字端口,而不是replica实例监听的端口。所以需要用户在配置文件中设置好report_host和report_port参数,并且在orch的配置文件中将参数DiscoverByShowSlaveHosts设置为true。
注意点
report_port report_port其实可以不在mysql配置文件中配置,因为report_port默认会被设置成slave的端口。
The default value for this option is the port number actually used by the slave. This is also the default value displayed by SHOW SLAVE HOSTS.
DiscoverByShowSlaveHosts设置为false 这种情况下,orch通过information_schema.processlist去发现从库。如果slave的端口和master的不一样,orch会假设从库监听的是和主库相同的端口,那么这个slave就无法被orch自动发现,需要人工手动进行发现:命令行:orchestrator-client -b hjj:hjj -c discover -i 10.10.30.230:3307web界面:clusters/discover实际生产环境中有可能主从端口不是同一个,所以DiscoverByShowSlaveHosts不能为false。DiscoverByShowSlaveHosts设置为true如果没有使用默认的3306端口,比如slave用的是3308端口,然后在mysql的配置文件中又没有配置report_host参数,orch会先尝试通过show slave hosts发现从库,但会报错,然后再通过processlist去发现从库。这个时候orch会假设从库监听的是和主库相同的端口(并不会使用show slave hosts中得到的port的信息,因为没有设置report_host,就无法将port和host对应),如果此时主库使用的是3306端口,那么这个slave就自动发现不了。
##这里我的master是10.10.30.230:3307,slave是10.10.30.249:3306,且从库没有设置report_host
// show slave hosts报错信息如下
2019-10-29 17:37:18 ERROR ReadTopologyInstance(10.10.30.230:3307) show slave hosts: ReadTopologyInstance(10.10.30.230:3307) 'show slave hosts' returned row with <host,port>: <,3306>
// 显示10.10.30.249:3307连不上,说明通过processlist发现从库用的是和主库相同的端口
2019-10-29 17:37:24 ERROR dial tcp 10.10.30.249:3307: connect: connection refused
此时需要手动进行发现:
命令行:orchestrator-client -b hjj:hjj -c discover -i 10.10.30.249:3306
web界面:clusters/discover
结 论
综上考虑,我们需要将DiscoverByShowSlaveHosts设置为true,并且至少在mysql配置文件中设置正确的report_host。参考文章https://github.com/github/orchestrator/blob/master/docs/supported-topologies-and-versions.md
http://code.openark.org/blog/mysql/the-importance-of-report_host-report_port
前 言
上篇文章讲了orchestrator复制拓扑的发现方式。本篇文章我们继续探索orchestrator的旅程,讲一讲orchestrator的探测机制。故障检测
orch使用了一种整体性的方法去探测主库和中间主库是否正常。一种比较天真的方法,比如,监控工具探测到主库无法连接或者查询,就发出报警。这种方法容易受到网络故障而造成误报。为了降低误报,会通过运行n次每次间隔t时间的方式。在某些情况下,这减少了误报的机会,但是增加了真正故障的响应时间。orchestrator会利用复制拓扑。orch不仅会监测主库,也会检测从库。比如,要诊断出主库挂了的情况,orch必须满足以下两个条件:联系不到主库。
可以联系到主库对应的从库,并且这些从库也连不上主库。
探测机制
orch会每隔InstancePollSeconds(默认5s)时间去被监控的实例上拉取实例状态,并将这些状态信息存入orch的元数据库的orchestrator.database_instance表中,然后orch会每隔InstancePollSeconds秒从元数据库中获取每个instance的状态,展示在web界面上。拉取实例状态的语句如下:show variables like 'maxscale%'
show global status like 'Uptime'
select @@global.hostname, ifnull(@@global.report_host, ''), @@global.server_id, @@global.version, @@global.version_comment, @@global.read_only, @@global.binlog_format, @@global.log_bin, @@global.log_slave_updates
show master status
show global status like 'rpl_semi_sync_%_status'
select @@global.gtid_mode, @@global.server_uuid, @@global.gtid_executed, @@global.gtid_purged, @@global.master_info_repository = 'TABLE', @@global.binlog_row_image
show slave status
select count(*) > 0 and MAX(User_name) != '' from mysql.slave_master_info
show slave hosts
select substring_index(host, ':', 1) as slave_hostname from information_schema.processlist where command IN ('Binlog Dump', 'Binlog Dump GTID')
SELECT SUBSTRING_INDEX(@@hostname, '.', 1)
拉取得到实例状态之后,通过下面语句将状态值存入到orch的元数据库中:
注:values后面的值就是上面拉取到的实例状态值。INSERT INTO database_instance
(hostname, port, last_checked, last_attempted_check, last_check_partial_success, uptime, server_id, server_uuid, version, major_version, version_comment, binlog_server, read_only, binlog_format, binlog_row_image, log_bin, log_slave_updates, binary_log_file, binary_log_pos, master_host, master_port, slave_sql_running, slave_io_running, replication_sql_thread_state, replication_io_thread_state, has_replication_filters, supports_oracle_gtid, oracle_gtid, master_uuid, ancestry_uuid, executed_gtid_set, gtid_mode, gtid_purged, gtid_errant, mariadb_gtid, pseudo_gtid, master_log_file, read_master_log_pos, relay_master_log_file, exec_master_log_pos, relay_log_file, relay_log_pos, last_sql_error, last_io_error, seconds_behind_master, slave_lag_seconds, sql_delay, num_slave_hosts, slave_hosts, cluster_name, suggested_cluster_alias, data_center, region, physical_environment, replication_depth, is_co_master, replication_credentials_available, has_replication_credentials, allow_tls, semi_sync_enforced, semi_sync_master_enabled, semi_sync_replica_enabled, instance_alias, last_discovery_latency, last_seen)
VALUES
('10.10.30.5', 3306, NOW(), NOW(), 1, 322504, 1521, 'e2685a0f-d8f8-11e9-a2c9-002590e95c3c', '5.7.22-log', '5.7', 'MySQL Community Server (GPL)', 0, 1, 'ROW', 'FULL', 1, 1, 'mysql-bin.000016', 129186924, '10.10.30.6', 3306, 1, 1, 1, 1, 0, 1, 1, '6bf30525-d8f8-11e9-808c-0cc47a74fca8', '6bf30525-d8f8-11e9-808c-0cc47a74fca8,e2685a0f-d8f8-11e9-a2c9-002590e95c3c', '6bf30525-d8f8-11e9-808c-0cc47a74fca8:1-1554568,\ne2685a0f-d8f8-11e9-a2c9-002590e95c3c:1-632541', 'ON', '', '', 0, 0, 'mysql-bin.000017', 150703414, 'mysql-bin.000017', 150703414, 'mysql-relay-bin.000052', 137056344, '', '', 0, 0, 0, 1, '[{\"Hostname\":\"10.10.30.6\",\"Port\":3306}]', '10.10.30.6:3306', 'qhp-6', '', '', '', 1, 1, 1, 1, 0, 0, 0, 0, '', 8083748, NOW())
ON DUPLICATE KEY UPDATE
hostname=VALUES(hostname), port=VALUES(port), last_checked=VALUES(last_checked), last_attempted_check=VALUES(last_attempted_check), last_check_partial_success=VALUES(last_check_partial_success), uptime=VALUES(uptime), server_id=VALUES(server_id), server_uuid=VALUES(server_uuid), version=VALUES(version), major_version=VALUES(major_version), version_comment=VALUES(version_comment), binlog_server=VALUES(binlog_server), read_only=VALUES(read_only), binlog_format=VALUES(binlog_format), binlog_row_image=VALUES(binlog_row_image), log_bin=VALUES(log_bin), log_slave_updates=VALUES(log_slave_updates), binary_log_file=VALUES(binary_log_file), binary_log_pos=VALUES(binary_log_pos), master_host=VALUES(master_host), master_port=VALUES(master_port), slave_sql_running=VALUES(slave_sql_running), slave_io_running=VALUES(slave_io_running), replication_sql_thread_state=VALUES(replication_sql_thread_state), replication_io_thread_state=VALUES(replication_io_thread_state), has_replication_filters=VALUES(has_replication_filters), supports_oracle_gtid=VALUES(supports_oracle_gtid), oracle_gtid=VALUES(oracle_gtid), master_uuid=VALUES(master_uuid), ancestry_uuid=VALUES(ancestry_uuid), executed_gtid_set=VALUES(executed_gtid_set), gtid_mode=VALUES(gtid_mode), gtid_purged=VALUES(gtid_purged), gtid_errant=VALUES(gtid_errant), mariadb_gtid=VALUES(mariadb_gtid), pseudo_gtid=VALUES(pseudo_gtid), master_log_file=VALUES(master_log_file), read_master_log_pos=VALUES(read_master_log_pos), relay_master_log_file=VALUES(relay_master_log_file), exec_master_log_pos=VALUES(exec_master_log_pos), relay_log_file=VALUES(relay_log_file), relay_log_pos=VALUES(relay_log_pos), last_sql_error=VALUES(last_sql_error), last_io_error=VALUES(last_io_error), seconds_behind_master=VALUES(seconds_behind_master), slave_lag_seconds=VALUES(slave_lag_seconds), sql_delay=VALUES(sql_delay), num_slave_hosts=VALUES(num_slave_hosts), slave_hosts=VALUES(slave_hosts), cluster_name=VALUES(cluster_name), suggested_cluster_alias=VALUES(suggested_cluster_alias), data_center=VALUES(data_center), region=VALUES(region), physical_environment=VALUES(physical_environment), replication_depth=VALUES(replication_depth), is_co_master=VALUES(is_co_master), replication_credentials_available=VALUES(replication_credentials_available), has_replication_credentials=VALUES(has_replication_credentials), allow_tls=VALUES(allow_tls), semi_sync_enforced=VALUES(semi_sync_enforced), semi_sync_master_enabled=VALUES(semi_sync_master_enabled), semi_sync_replica_enabled=VALUES(semi_sync_replica_enabled), instance_alias=VALUES(instance_alias), last_discovery_latency=VALUES(last_discovery_latency), last_seen=VALUES(last_seen)
然后orch会每隔InstancePollSeconds秒从元数据库中获取每个被监控实例的状态,通过web端展示到页面上。
探测实例失败
如果某个instance挂了,orch每隔InstancePollSeconds时间拉取实例状态失败,无法获取到最新的实例状态,也就无法用上面这条insert将实例状态存入到元数据库中,那么orch会按下面的方式更新元数据库:// 每隔InstancePollSeconds时间更新database_instance表的last_checked和last_check_partial_success字段
update database_instance set last_checked = NOW(), last_check_partial_success = 0 where hostname = '10.10.30.170' and port = 3306
// 每隔InstancePollSeconds+1s时间更新database_instance表的last_attempted_check字段
update database_instance set last_attempted_check = NOW() where hostname = '10.10.30.170' and port = 3306
这里为什么要引入last_attempted_check,摘两处源码中的注释。
// UpdateInstanceLastAttemptedCheck updates the last_attempted_check timestamp in the orchestrator backed database
// for a given instance.
// This is used as a failsafe mechanism in case access to the instance gets hung (it happens), in which case
// the entire ReadTopology gets stuck (and no, connection timeout nor driver timeouts don't help. Don't look at me,
// the world is a harsh place to live in).
// And so we make sure to note down *before* we even attempt to access the instance; and this raises a red flag when we
// wish to access the instance again: if last_attempted_check is *newer* than last_checked, that's bad news and means
// we have a "hanging" issue.
func UpdateInstanceLastAttemptedCheck(instanceKey *InstanceKey) error {
   writeFunc := func() error {
      _, err := db.ExecOrchestrator(`
       update
          database_instance
       set
          last_attempted_check = NOW()
         where
            hostname = ?
            and port = ?`,
         instanceKey.Hostname,
         instanceKey.Port,
      )
      return log.Errore(err)
   }
   return ExecDBWriteFunc(writeFunc)
}

// ValidSecondsFromSeenToLastAttemptedCheck returns the maximum allowed elapsed time
// between last_attempted_check to last_checked before we consider the instance as invalid.
func ValidSecondsFromSeenToLastAttemptedCheck() uint {
   return config.Config.InstancePollSeconds + 1
}
判断实例是否存活
被orch监控的实例是否正常,通过如下方式进行判断:// instance每隔InstancePollSeconds时间通过如下方式判断某个instance是否正常
select ifnull(last_checked <= last_seen, 0) as is_last_check_valid from database_instance where hostname = '10.10.30.170' and port = 3306 order by hostname, port;
// master instance是否存活的判断比较复杂
// 首先,orch会每秒通过类似于如下方式判断master instance是否正常
SELECT MIN(master_instance.last_checked <= master_instance.last_seen and master_instance.last_attempted_check <= master_instance.last_seen + interval 6 second) = 1 AS is_last_check_valid from database_instance master_instance GROUP BY master_instance.hostname, master_instance.port;
// 如果is_last_check_valid为0,然后需要判断master instance对应的从库是否连得上,并且这些从库是否也连不上主库
参考:https://github.com/github/orchestrator/blob/master/docs/failure-detection.md
// 整个sql如下:
SELECT master_instance.hostname, master_instance.port, master_instance.read_only AS read_only, MIN(master_instance.data_center) AS data_center, MIN(master_instance.region) AS region, MIN(master_instance.physical_environment) AS physical_environment, MIN(master_instance.master_host) AS master_host, MIN(master_instance.master_port) AS master_port, MIN(master_instance.cluster_name) AS cluster_name, MIN(IFNULL(cluster_alias.alias, master_instance.cluster_name)) AS cluster_alias, MIN( master_instance.last_checked <= master_instance.last_seen and master_instance.last_attempted_check <= master_instance.last_seen + interval 6 second ) = 1 AS is_last_check_valid, MIN(master_instance.last_check_partial_success) as last_check_partial_success, MIN(master_instance.master_host IN ('' , '_') OR master_instance.master_port = 0 OR substr(master_instance.master_host, 1, 2) = '//') AS is_master, MIN(master_instance.is_co_master) AS is_co_master, MIN(CONCAT(master_instance.hostname, ':', master_instance.port) = master_instance.cluster_name) AS is_cluster_master, MIN(master_instance.gtid_mode) AS gtid_mode, COUNT(replica_instance.server_id) AS count_replicas, IFNULL(SUM(replica_instance.last_checked <= replica_instance.last_seen), 0) AS count_valid_slaves, IFNULL(SUM(replica_instance.last_checked <= replica_instance.last_seen AND replica_instance.slave_io_running != 0 AND replica_instance.slave_sql_running != 0), 0) AS count_valid_replicating_slaves, IFNULL(SUM(replica_instance.last_checked <= replica_instance.last_seen AND replica_instance.slave_io_running = 0 AND replica_instance.last_io_error like '%error %connecting to master%' AND replica_instance.slave_sql_running = 1), 0) AS count_replicas_failing_to_connect_to_master, MIN(master_instance.replication_depth) AS replication_depth, GROUP_CONCAT(concat(replica_instance.Hostname, ':', replica_instance.Port)) as slave_hosts, MIN( master_instance.slave_sql_running = 1 AND master_instance.slave_io_running = 0 AND master_instance.last_io_error like '%error %connecting to master%' ) AS is_failing_to_connect_to_master, MIN( master_downtime.downtime_active is not null and ifnull(master_downtime.end_timestamp, now()) > now() ) AS is_downtimed, MIN( IFNULL(master_downtime.end_timestamp, '') ) AS downtime_end_timestamp, MIN( IFNULL(unix_timestamp() - unix_timestamp(master_downtime.end_timestamp), 0) ) AS downtime_remaining_seconds, MIN( master_instance.binlog_server ) AS is_binlog_server, MIN( master_instance.pseudo_gtid ) AS is_pseudo_gtid, MIN( master_instance.supports_oracle_gtid ) AS supports_oracle_gtid, SUM( replica_instance.oracle_gtid ) AS count_oracle_gtid_slaves, IFNULL(SUM(replica_instance.last_checked <= replica_instance.last_seen AND replica_instance.oracle_gtid != 0), 0) AS count_valid_oracle_gtid_slaves, SUM( replica_instance.binlog_server ) AS count_binlog_server_slaves, IFNULL(SUM(replica_instance.last_checked <= replica_instance.last_seen AND replica_instance.binlog_server != 0), 0) AS count_valid_binlog_server_slaves, MIN( master_instance.mariadb_gtid ) AS is_mariadb_gtid, SUM( replica_instance.mariadb_gtid ) AS count_mariadb_gtid_slaves, IFNULL(SUM(replica_instance.last_checked <= replica_instance.last_seen AND replica_instance.mariadb_gtid != 0), 0) AS count_valid_mariadb_gtid_slaves, IFNULL(SUM(replica_instance.log_bin AND replica_instance.log_slave_updates), 0) AS count_logging_replicas, IFNULL(SUM(replica_instance.log_bin AND replica_instance.log_slave_updates AND replica_instance.binlog_format = 'STATEMENT'), 0) AS count_statement_based_loggin_slaves, IFNULL(SUM(replica_instance.log_bin AND replica_instance.log_slave_updates AND replica_instance.binlog_format = 'MIXED'), 0) AS count_mixed_based_loggin_slaves, IFNULL(SUM(replica_instance.log_bin AND replica_instance.log_slave_updates AND replica_instance.binlog_format = 'ROW'), 0) AS count_row_based_loggin_slaves, IFNULL(SUM(replica_instance.sql_delay > 0), 0) AS count_delayed_replicas, IFNULL(SUM(replica_instance.slave_lag_seconds > 10), 0) AS count_lagging_replicas, IFNULL(MIN(replica_instance.gtid_mode), '') AS min_replica_gtid_mode, IFNULL(MAX(replica_instance.gtid_mode), '') AS max_replica_gtid_mode, IFNULL(MAX( case when replica_downtime.downtime_active is not null and ifnull(replica_downtime.end_timestamp, now()) > now() then '' else replica_instance.gtid_errant end ), '') AS max_replica_gtid_errant, IFNULL(SUM( replica_downtime.downtime_active is not null and ifnull(replica_downtime.end_timestamp, now()) > now()), 0) AS count_downtimed_replicas, COUNT(DISTINCT case when replica_instance.log_bin AND replica_instance.log_slave_updates then replica_instance.major_version else NULL end ) AS count_distinct_logging_major_versions FROM database_instance master_instance LEFT JOIN hostname_resolve ON (master_instance.hostname = hostname_resolve.hostname) LEFT JOIN database_instance replica_instance ON (COALESCE(hostname_resolve.resolved_hostname, master_instance.hostname) = replica_instance.master_host AND master_instance.port = replica_instance.master_port) LEFT JOIN database_instance_maintenance ON (master_instance.hostname = database_instance_maintenance.hostname AND master_instance.port = database_instance_maintenance.port AND database_instance_maintenance.maintenance_active = 1) LEFT JOIN database_instance_downtime as master_downtime ON (master_instance.hostname = master_downtime.hostname AND master_instance.port = master_downtime.port AND master_downtime.downtime_active = 1) LEFT JOIN database_instance_downtime as replica_downtime ON (replica_instance.hostname = replica_downtime.hostname AND replica_instance.port = replica_downtime.port AND replica_downtime.downtime_active = 1) LEFT JOIN cluster_alias ON (cluster_alias.cluster_name = master_instance.cluster_name) WHERE database_instance_maintenance.database_instance_maintenance_id IS NULL AND '' IN ('', master_instance.cluster_name) GROUP BY master_instance.hostname, master_instance.port HAVING (MIN( master_instance.last_checked <= master_instance.last_seen and master_instance.last_attempted_check <= master_instance.last_seen + interval 6 second ) = 1 ) = 0 OR (IFNULL(SUM(replica_instance.last_checked <= replica_instance.last_seen AND replica_instance.slave_io_running = 0 AND replica_instance.last_io_error like '%error %connecting to master%' AND replica_instance.slave_sql_running = 1), 0) > 0) OR (IFNULL(SUM(replica_instance.last_checked <= replica_instance.last_seen), 0) < COUNT(replica_instance.server_id) ) OR (IFNULL(SUM(replica_instance.last_checked <= replica_instance.last_seen AND replica_instance.slave_io_running != 0 AND replica_instance.slave_sql_running != 0), 0) < COUNT(replica_instance.server_id) ) OR (MIN( master_instance.slave_sql_running = 1 AND master_instance.slave_io_running = 0 AND master_instance.last_io_error like '%error %connecting to master%' ) ) OR (COUNT(replica_instance.server_id) > 0) ORDER BY is_master DESC , is_cluster_master DESC, count_replicas DESC\G
前 言
上篇文章讲了orchestrator的探测机制。本篇文章翻译自orchestrator官方文档,讲一讲orchestrator的拓扑恢复。
拓扑恢复
orch能够从一系列故障场景中进行恢复。尤其是,它能够对主库或者中间主库的故障场景进行恢复。
自动和手动orch支持:
- 自动恢复(对意外故障采取措施)。
- 优雅地、有计划地主从切换。
- 手动恢复。
手动,强制failover。
要运行任何类型的故障转移,拓扑必须支持以下任一种:
- Oracle GTID(master_auto_position=1)
- MariaDB GTID
- Pseudo GTID(伪GTID)
Binlog Servers
恢复基于故障检测,并且由一系列事件组成:
- 恢复前的hooks(hook:外部的执行过程或者脚本)。
- 修复拓扑。
恢复后的hooks。
注意:
- 恢复前的hooks由用户自己配置。- 顺序执行。
- 任何一个hook的失败(非零退出码)都将中止故障转移。
- 拓扑修复是由orch管理的,并且是基于状态,而不是基于配置。orch在考虑到现有拓扑、版本、服务器配置等因素的情况下,会力图尽力而为。
恢复后的hooks也是由用户自己配置。
- 找到已失效的中间主服务器的同级,然后将孤立的副本移到所述同级之下。
- 从孤立的副本中提升某个副本,使得这个副本成为同级的中间主库,然后将这个副本连接到拓扑。
- 重置所有的孤立副本。
- 结合以上部分做法。
实际的实现方式很大程度上取决于拓扑设置(哪些实例设置了log-slave-updates、实例是否有延迟、是否存在复制过滤、mysql的版本等等)。你的拓扑很有可能至少支持以上一种方式(特别是,匹配副本是一个简单的解决方案,除非使用了复制过滤)。
恢复场景2:主库挂掉从挂掉的主库恢复是一个更为复杂的操作,有很多种原因:- 有潜在的运行中断(停电、网络),恢复要尽可能地快。
- 在恢复过程中,有些servers可能会丢失。orch需要确定会是哪个。
- 拓扑的状态可能是用户希望阻止恢复。
- 必须进行主服务发现:应用必须能够与新的主库进行通讯(潜在地被告知主库已经更改了)。
- 需要找到最合适的replica,将其提升为主库。- 一个天真的方法是选择最新的副本,但这不一定总是正确的选择。- 最新的副本不一定有必要的配置来作为其他replica的主库(比如:binlog format、mysql版本、复制过滤器等)。盲目地提升最新的副本为主库,可能会失去副本冗余的能力。- orch会尝试提升保留最大服务容量的副本为主库。
- 提升所述副本,接管它的同级。
- 使它的同级保持最新状态(up to date)。
- 也许,要做一个二阶段提升;用户可能已经标记了要提升的特定服务器(参考register-candidate命令)。
- 调用hooks。
- 基于DNS的发现;orch需要调用能修改DNS入口的hook。
- ZooKeeper/Consul KV/etcd/其他基于键值的发现;orch内置了对Consul KV的支持,否则外部的hook必须更新k-v存储系统。
- 基于proxy的发现;orch会调用外部的hook去更新proxy的配置,或者更新如上所说的Consul/Zk/etcd,这本身就会触发更新proxy的配置。
- 其他方式。
- 一种可操作的场景(只有一个主库的情况就不符合)。
- 未处于downtime的实例。
- 对于属于某个集群的实例,这个集群通过配置明确启用了恢复。
- 对于最近尚未恢复的集群中的实例,除非确认了这些最近的恢复。
- 启用了全局恢复。
通常,出于升级,主机维护等,会要将主库替换成另一台。这就是优雅的提升主库。在优雅的接管中:
- 指定一台server去提升。
- orch会将master设置成read-only。
- orch确保指定的服务器追上了复制。
- orch将指定的server提升为新的主库。
- orch将提升的server设置为可写。
- PreGracefulTakeoverProcesses
- PostGracefulTakeoverProcesses
- 指定要提升的server(必须是master的直接replica)。
- 设置拓扑,使得master下只存在一个直接replica(在这种情况下,指定副本的身份不重要,无需提及)。
- 命令行:orchestrator-client -c graceful-master-takeover -alias mycluster -s designated.master.to.promote:3306
- web api:
- /api/graceful-master-takeover/:clusterHint/:designatedHost/:designatedPort
优雅地提升新主库(计划的故障转移),指定要提升的服务器。- /api/graceful-master-takeover/:clusterHint
优雅地提升新主库(计划的故障转移)。未指定服务器,在master只有一个直接副本时起作用。 - web界面:- 将master的直接副本拖拽到master框的左半边。
可以通过提供一个失败的特定实例来让orch来进行恢复。该实例必须被识别为failure。可以对处于downtime的实例请求恢复(因为这是手动恢复,能够覆盖掉自动的配置)。通过以下方式恢复:
- 命令行:orchestrator-client -c recover -i dead.instance.com:3306 --debug
- web api:/api/recover/dead.instance.com/:3306
- web界面:实例变成了黑色;点击recovery按钮。
也许,orch不认为某个实例fail了,或者你的应用逻辑要求master此刻必须change,或者也许orch对fail的类型不是很确定。你希望此刻就进行故障转移,可以这么做:
- 命令行:orchestrator-client -c force-master-failover --alias mycluster或者orchestrator-client -c force-master-failover -i instance.in.that.cluster
- web api:/api/force-master-failover/mycluster或者/api/force-master-failover/instance.in.that.cluster/3306
- /web/audit-recovery
- /api/audit-recovery
- /api/audit-recovery-steps/:uid
- /api/blocked-recoveries: 被阻塞的恢复。
- /api/ack-recovery/cluster/:clusterHint: 确认给定集群上的恢复。
- /api/ack-all-recoveries: 确认所有恢复。
- /api/disable-global-recoveries: 全局开关以禁用orch运行任何恢复。
- /api/enable-global-recoveries: 重新启用恢复。
- /api/check-global-recoveries: 检查是否启用了全局恢复。
- /api/recover/:host/:port: 恢复指定主机,假定orch认同发生了故障。
- /api/recover-lite/:host/:port: 和上面相同,不使用外部hooks (对测试有用)。
- /api/graceful-master-takeover/:clusterHint/:designatedHost/:designatedPort: 优雅地提升一个新主(计划的故障转移), 指定要提升的服务器。
- /api/graceful-master-takeover/:clusterHint: 优雅地提升一个新主(计划的故障转移)。未指定服务器,在master只有一个直接副本时起作用。
- /api/force-master-failover/:clusterHint: 紧急情况下,强制给定集群进行故障转移。
- orchestrator-client -c recover -i some.instance:3306
- orchestrator-client -c graceful-master-takeover -i some.instance.in.somecluster:3306
- orchestrator-client -c graceful-master-takeover -alias somecluster
- orchestrator-client -c force-master-takeover -alias somecluster
- orchestrator-client -c ack-cluster-recoveries -alias somecluster
- orchestrator-client -c ack-all-recoveries
- orchestrator-client -c disable-global-recoveries
- orchestrator-client -c enable-global-recoveries
- orchestrator-client -c check-global-recoveries
阻塞时间段用参数RecoveryPeriodBlockSeconds表示。它仅用于在同一集群上的恢复。在不同集群上的并行恢复是不受影响的。处于pending状态中的恢复一旦超过了RecoveryPeriodBlockSeconds时间或者已经被确认(acknowledged),则阻塞就被解除。可以通过Web API /界面(查看audit/recovery page)或通过命令行界面(orchestrator-client -c ack-cluster-recoveries -alias somealias)确认恢复。请注意,手动恢复(例如orchestrator-client -c recover或orchstrator-client -c force-master-failover)会忽略阻塞时间段。 添加提升规则在发生故障转移时,某些服务器更适合被提升为主库,某些服务器则不适合被提升为主库。例如:
- 某个服务器的硬件配置较差。偏向于不提升它为主库。
- 某个服务器位于远程的数据中心,不想要把它提升为主库。
- 某个服务器用作备份源,并且始终打开LVM快照。不想要把它提升为主库。
- 某个服务器配置不错,非常适合作为candidate。偏向于提升它为主库。
- 某个服务器配置一般,没有特别的偏好。
orchestrator -c register-candidate -i ${::fqdn} --promotion-rule ${promotion_rule}
提升规则有:
- prefer
- neutral
- prefer_not
must_not
*/2 * * * * root "/usr/bin/perl -le 'sleep rand 10' && /usr/bin/orchestrator-client -c register-candidate -i this.hostname.com --promotion-rule prefer"此设置来自生产环境。这个cron会通过puppet来更新,来表示合适的promotion_rule。某个服务器可能在某个时刻会是perfer,但5分钟过后变成了prefer_not。整合你自己的服务发现方法、脚本,来提供最新的promotion_rule。 停机时间(Downtime)所有的故障/恢复已经分析了。但是,还应该考虑实例的停机状态。某个实例可以通过orchestrator-client -c begin-downtime被停机。自动恢复会跳过停机的服务器。
实际上,停机是专门为此目的而创建的,它使DBA可以阻止自动故障转移到特定服务器。请注意,手动恢复(例如orchestrator-client -c recover)将覆盖停机时间。 recovery hooksorch支持hooks——在恢复过程中调用的外部脚本。这些是通过shell调用的命令数组,尤其是bash。
- OnFailureDetectionProcesses:当检测故障转移现象时执行(在决定是否进行故障转移之前)。
- PreGracefulTakeoverProcesses:graceful master takeover时执行,在master变成read-only之前立即执行。
- PreFailoverProcesses:在orch进行恢复操作之前立即执行。在这个过程中任何的失败(非零退出代码)都会终止恢复。提示:这使得有机会根据系统的某些内部状态中止恢复。
- PostMasterFailoverProcesses:在主恢复成功结束时执行。
- PostIntermediateMasterFailoverProcesses:在中间主恢复成功结束时执行。
- PostFailoverProcesses:在任何成功的恢复结束时执行(包括以及补充到PostMasterFailoverProcesses、PostIntermediateMasterFailoverProcesses)。
- PostUnsuccessfulFailoverProcesses:在任何不成功的恢复结束时执行。
- PostGracefulTakeoverProcesses:在有计划地、优雅地主库切换的时候会执行,在旧主库位于新主库之后执行。
原文:
https://github.com/github/orchestrator/blob/master/docs/topology-recovery.mdMySQL高可用工具Orchestrator系列五:raft多节点模式安装
前 言
本篇文章介绍Orchestrator raft多节点模式的安装。
环 境
orchestrator机器:10.10.30.150、10.10.30.128、10.10.30.145
orchestrator后端元数据库MySQL:10.10.30.150、10.10.30.128、10.10.30.145
目标监控数据库:10.10.30.130:3306
安装orchestrator元数据库MySQL
在每一台orchestrator机器上安装MySQL,安装的步骤省略,和常规安装MySQL一样。安装完成后创建orchestrator需要用到的库和用户。
CREATE DATABASE IF NOT EXISTS orchestrator;
CREATE USER 'orchestrator'@'127.0.0.1' IDENTIFIED BY 'orchestrator';
GRANT ALL PRIVILEGES ON `orchestrator`.* TO 'orchestrator'@'127.0.0.1';
这里元数据库MySQL和orchestrator在同一台机器上,所以创建账号的时候用的'127.0.0.1',如果不在同一台机器上,将IP换成orchestrator所在机器ip。
密码按需修改
安装orchestrator
下载orchestrator安装包,这里用的是orchestrator-3.1.2-linux-amd64.tar.gz
https://github.com/github/orchestrator/releases在每一台orchestrator机器上,解压orchestrator安装包。
tar -xvzf orchestrator-3.1.2-linux-amd64.tar.gz -C /
将/usr/local/orchestrator/orchestrator-sample.conf.json移动到/etc下,并命名为orchestrator.conf.json
[root@10-10-30-150 orchestrator]# ls
orchestrator orchestrator-sample-sqlite.conf.json orchestrator-sample.conf.json resources
[root@10-10-30-150 orchestrator]# cp orchestrator-sample.conf.json /etc/orchestrator.conf.json
目标监控数据库授权
在需要监控的目标数据库上进行授权。这里目标数据库是:10.10.30.130:3306
CREATE USER 'orchestrator'@'orch_host' IDENTIFIED BY 'orch_topology_password';
GRANT SUPER, PROCESS, REPLICATION SLAVE, RELOAD ON *.* TO 'orchestrator'@'orch_host';
GRANT SELECT ON mysql.slave_master_info TO 'orchestrator'@'orch_host';
GRANT SELECT ON ndbinfo.processes TO 'orchestrator'@'orch_host'; -- Only for NDB Cluster
其中,将'orch_host' 改成对应orch所在服务器的ip,'orch_topology_password'改成合适的密码。这里orch_host是10.10.30.%,将密码改为orchestrator。
修改orchestrator配置文件
修改/etc/orchestrator.conf.json如下:
/// 配置orchestrator后端元数据库信息
...
"MySQLOrchestratorHost": "127.0.0.1",
"MySQLOrchestratorPort": 3306,
"MySQLOrchestratorDatabase": "orchestrator",
"MySQLOrchestratorUser": "orchestrator",
"MySQLOrchestratorPassword": "orchestrator",
...
/// 配置orchestrator监控的目标数据库信息
"MySQLTopologyUser": "orchestrator",
"MySQLTopologyPassword": "orchestrator",
...
/// 配置raft的相关参数
"RaftEnabled": true,
"RaftDataDir": "/var/lib/orchestrator",
"RaftBind": "10.10.30.150", #本机ip或者hostname
"DefaultRaftPort": 10008, #raft端口
"RaftNodes": [
"10.10.30.150",
"10.10.30.128",
"10.10.30.145"
  ]
启动orchestrator
在每台orchestrator机器上启动orchestrator服务。
cd /usr/local/orchestrator && ./orchestrator --config=/etc/orchestrator.conf.json http > /usr/local/orchestrator/orchestrator.log 2>&1 &
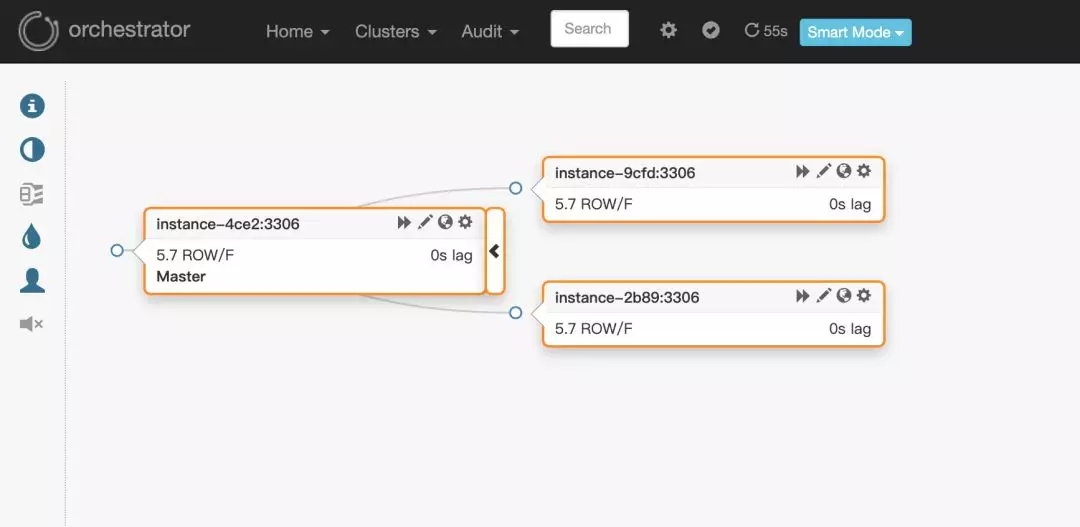
web端访问地址10.10.30.150:3000。页面效果如下:
问 题
这里假定环境:
10.10.30.170是从库
10.10.30.130是主库
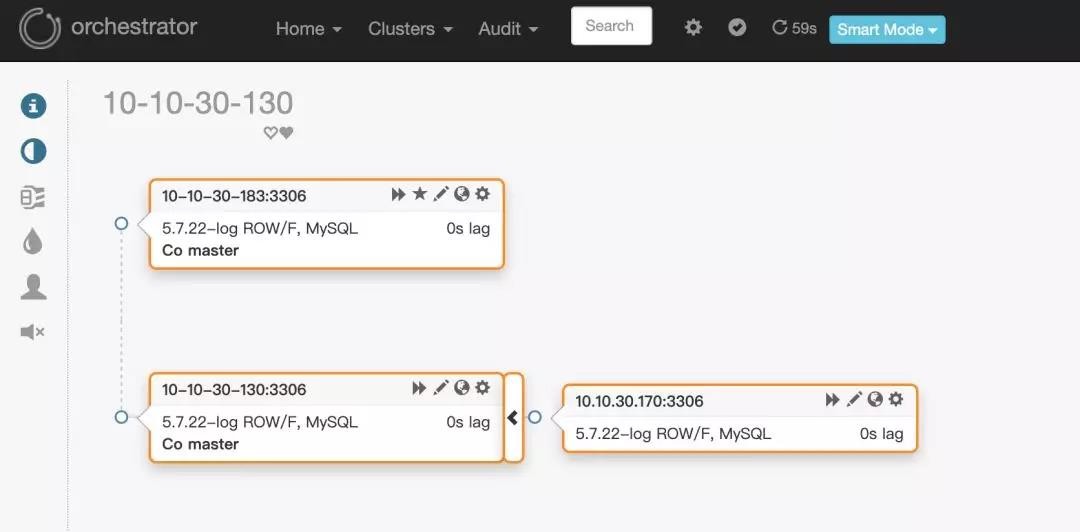
如上图所示
3.1.2版本的orchestrator在通过从库10.10.30.170发现主库的时候,通过show slave status得到的master_host虽然是10.10.30.130,但是页面上显示的却是10.10.30.130这个ip对应的hostname:10-10-30-130,如下图所示:
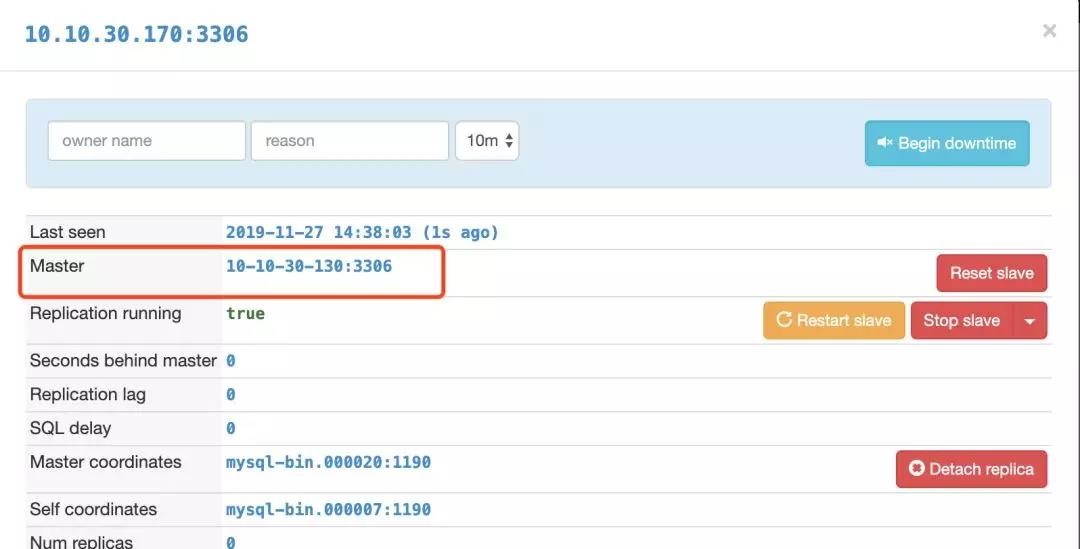
因此,orchestrator会报10-10-30-130找不到:
2019-11-27 13:48:29 ERROR dial tcp: lookup 10-10-30-130 on 223.5.5.5:53: no such host
如何解决
- 将orchestrator版本换成3.1.0
- 在orchestrator机器上的/etc/hosts下配置域名解析信息,添加如下:
10.10.30.130 10-10-30-130
10.10.30.183 10-10-30-183
10.10.30.170 10-10-30-170
MySQL高可用工具Orchestrator系列六:Orchestrator/raft一致性集群
前言
本篇文章翻译自orchestrator官方文档,讲一讲Orchestrator/raft一致性集群相关的内容。
Orchestrator/raft,一致性集群
Orchestrator/raft的部署方式解决了orchestrator自身的高可用,以及解决了网络隔离的问题,尤其是跨数据中心网络分区和隔离。
raft特征的简要概述
通过一致性协议,orchestrator节点可以选出具有法定票数的leader,这意味这它没有被隔离。举例来说,有一个3节点的Orchestrator/raft配置。正常情况下,3个节点之前会互相通讯,其中一个会被选为leader。然而,面临网络分区的时候,假设节点n1被n2和n3隔离出去,Orchestrator/raft保证了leader是n2或者n3。n1因为没有法定票数,不会成为leader(一个3节点的配置,法定票数是2;一个5节点的配置,法定票数是3)。这种方式在跨数据中心的配置情况下被验证是有用的。假设有三个orchestrator节点,每个节点位于各自的数据中心。如果一个数据中心被隔离了,则确保活跃的orchestrator节点是一个具有一致性共识的节点,即活跃的是被隔离节点之外的两个节点。
Orchestrator/raft配置技术细节
服务节点
配置3个或者5个(推荐的raft节点数)orchestrator节点。其他数量也是可以的,但至少要3节点。目前为止,orchestrator节点还不能动态加入集群。节点列表已预先配置如下:
"RaftEnabled": true,
"RaftDataDir": "/var/lib/orchestrator",
"RaftBind": "<ip.or.fqdn.of.this.orchestrator.node>",
"DefaultRaftPort": 10008,
"RaftNodes": [
"<ip.or.fqdn.of.orchestrator.node1>",
"<ip.or.fqdn.of.orchestrator.node2>",
"<ip.or.fqdn.of.orchestrator.node3>"
  ],
后端DB
每个orchestrator节点有自己的专用后端服务器。这可以是:- MySQL后端数据库(无需复制设置,但如果此服务器有副本也可以) 作为部署建议,此MySQL服务器可以在同一orchestrator节点主机上运行。
- 一个SQLite后端数据库。使用:
"BackendDB": "sqlite",
"SQLite3DataFile": "/var/lib/orchestrator/orchestrator.db",
orchestrator与sqllite,无需安装额外的依赖项。
Proxy:leader
只有leader才能做变更操作。最简单的配置是将流量路由到leader,通过http proxy(例如HAProxy)在orchestrator服务之上设置代理。- 使用/api/leader-check做健康检查。在任何时间,针对健康检查,最多有一个orchestrator节点将回复HTTP 200/OK;其他节点会回应HTTP 404/Not found。- 提示:例如,可以使用/api/leader-check/503来返回用户期望的响应代码503,或者任意相似的代码。
- 仅将流量定向到通过此测试的节点
bind 0.0.0.0:80 process 1
bind 0.0.0.0:80 process 2
bind 0.0.0.0:80 process 3
bind 0.0.0.0:80 process 4
mode tcp
option httpchk GET /api/leader-check
maxconn 20000
balance first
retries 1
timeout connect 1000
timeout check 300
timeout server 30s
timeout client 30s
default-server port 3000 fall 1 inter 1000 rise 1 downinter 1000 on-marked-down shutdown-sessions weight 10
server orchestrator-node-0 orchestrator-node-0.fqdn.com:3000 check
server orchestrator-node-1 orchestrator-node-1.fqdn.com:3000 check
server orchestrator-node-2 orchestrator-node-2.fqdn.com:3000 check
Proxy:健康的raft节点
放宽了上述约束。健康的raft节点将用户请求反向代理给leader。你可以选择访问任一健康的raft节点。你不能访问不健康的raft节点,也就是说被法定投票隔离出去的节点。- 使用/api/raft-health来辨认一个节点是健康的raft group的一部分。
- 一个HTTP 200/OK的响应说明节点是健康组的一部分,可以直接流量到此节点。
- HTTP 500/Internal Server Error表明节点不是健康组的一部分。请注意,启动后立即进行选举,直到选举出领导者为止,您可能需要等待一段时间,在这段时间,所有节点均报告为不正常。请注意,在重新选举领导者后,您可能会看到一个短暂的时期,所有节点均报告为不正常。
orchestrator-client
一个替代proxy的方法是使用orchestrator-client。orchestrator-client是一个封装脚本,可以通过HTTP API访问orchestrator服务,并对用户提供命令行接口。可以配置好所有orchestrator API endpoint列表供orchestrator-client使用。在这种情况下,orchestrator-client会找到哪个endpoint是leader,并将请求直接发给它。例如,我们可以设置:export ORCHESTRATOR_API="https://orchestrator.host1:3000/api https://orchestrator.host2:3000/api https://orchestrator.host3:3000/api"
调用orchestrator-client会先进行检查。
其他情况,如果你已经有了proxy,orchestrator-client也可以使用此代理,例如:export ORCHESTRATOR_API="https://orchestrator.proxy:80/api"
Orchestrator/raft配置下的行为和可能的结果
在raft设置中,每个orchestrator节点独立运行所有服务器的发现(discovery)。这意味着在三节点设置中,每个MySQL拓扑服务器将由三个不同的orchestrator节点独立访问。
在正常情况下,这三个节点看到的拓扑大致相同。但是他们每个节点都有自己独立的分析(analysis)。
每个orchestrator节点都写入自己的专用后端DB服务器(无论是MySQL还是sqlite)
orchestrator节点的通信是最小的。他们不共享发现信息(因为他们各自独立发现)。相反,领导者与其他节点共享截获了哪些用户指令,例如:
begin-downtime
register-candidate
等等
leader还会针对进行中的故障转移对follower进行educate。
orchestrator节点之间的通信与数据库的事务提交是不相关的,并且是稀少的。
所有用户更改都必须经过领导者,尤其是要通过HTTP API。你不能直接操作后端数据库,因为这样的更改不会发布到其他节点。
在orchestrator/raft配置下,启用了raft之后,运行客户端命令orchestrator会被拒绝。
可以使用orchestrator-client脚本,它提供了和命令行orchestrator相似的接口,来使用和操作HTTP API调用。
你只需要在orchestrator服务器上安装orchestrator二进制包。而orchestrator-client脚本可以安装在任意地方。
单个orchestrator节点的故障不会响应orchestrator服务的可用性。3节点的配置最多可以一个故障,5节点的配置最多可以有二个故障。
没有后端数据库,orchestrator节点无法运行。如果后端数据库是sqllite,,这是不重要的,因为sqlite嵌入了orchestrator。如果后端数据库是MySQL,如果在一段时间内orchestrator无法连接到后端数据库,则该服务将失效。
一个orchestrator节点可能会下线,然后再加入。它将重新加入该raft小组,并接收下线时错过的任何事件。节点离开多长时间都没有关系。如果它没有相关的本地raft日志/快照,则另一个节点将自动向其提供最新的快照。
如果orchestrator无法加入raft组,则它会失效。
orchestrator/raft的主要优势
高可用
一致性:故障转移是由仲裁成员的领导者节点进行的(不是孤立的)
支持SQLite(内嵌)后端,MySQL尽管支持,但不一定需要。
跨节点通信少;适用于高延迟的跨DC网络
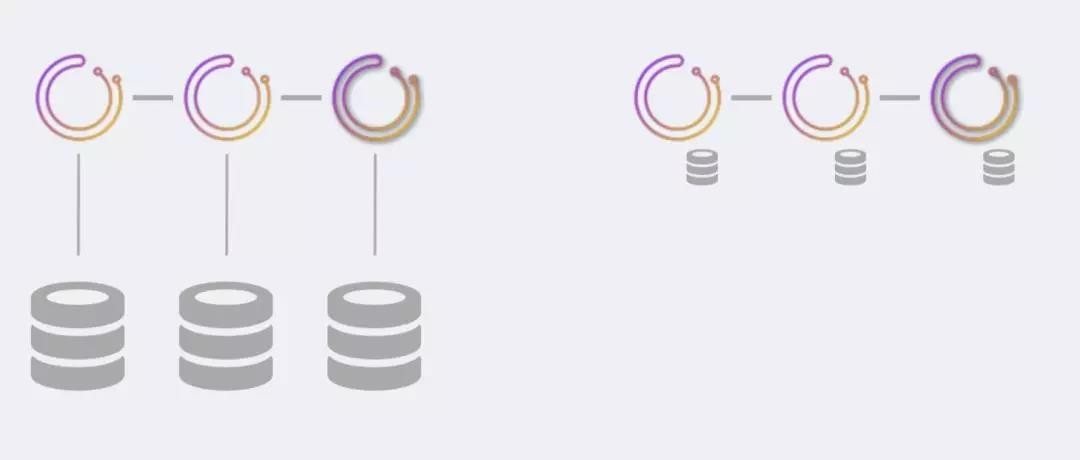
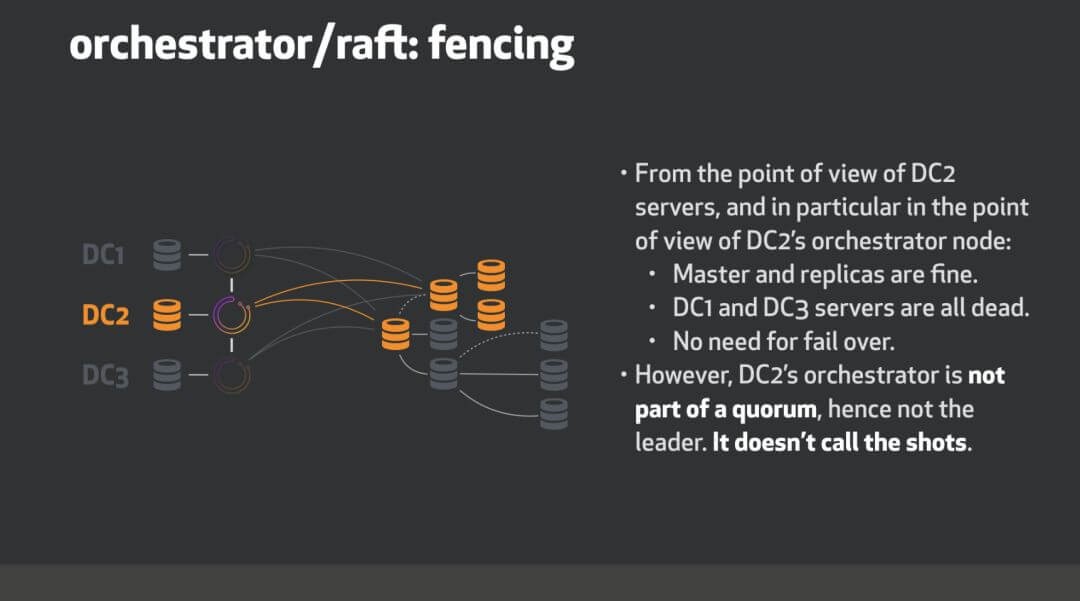
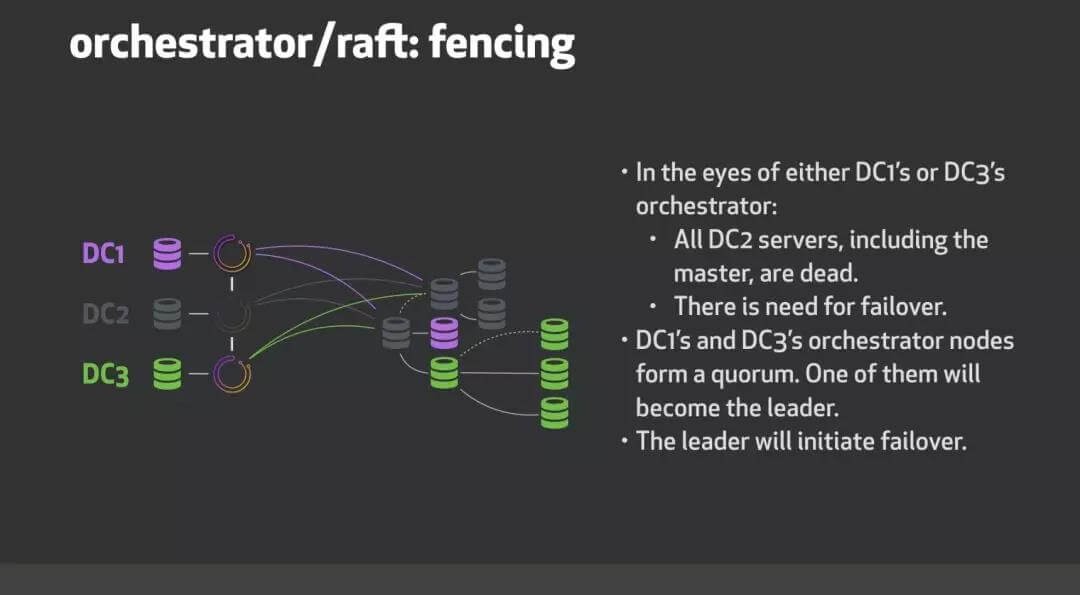
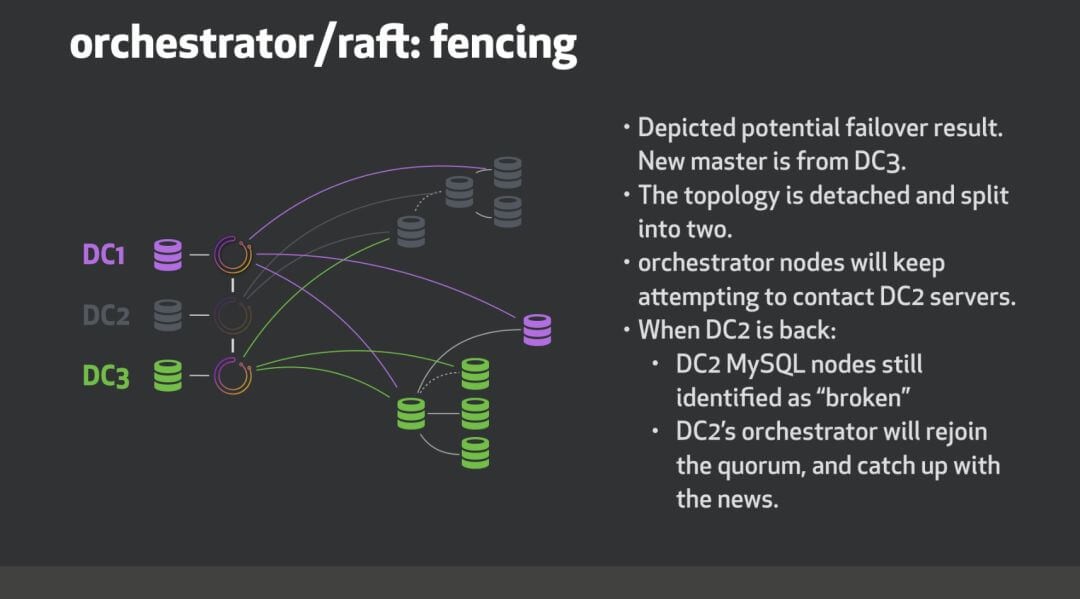
数据中心隔离示例
考虑三个数据中心,这个例子中DC1,DC2和DC3。我们orchestrator/raft使用三个节点运行,每个数据中心一个。
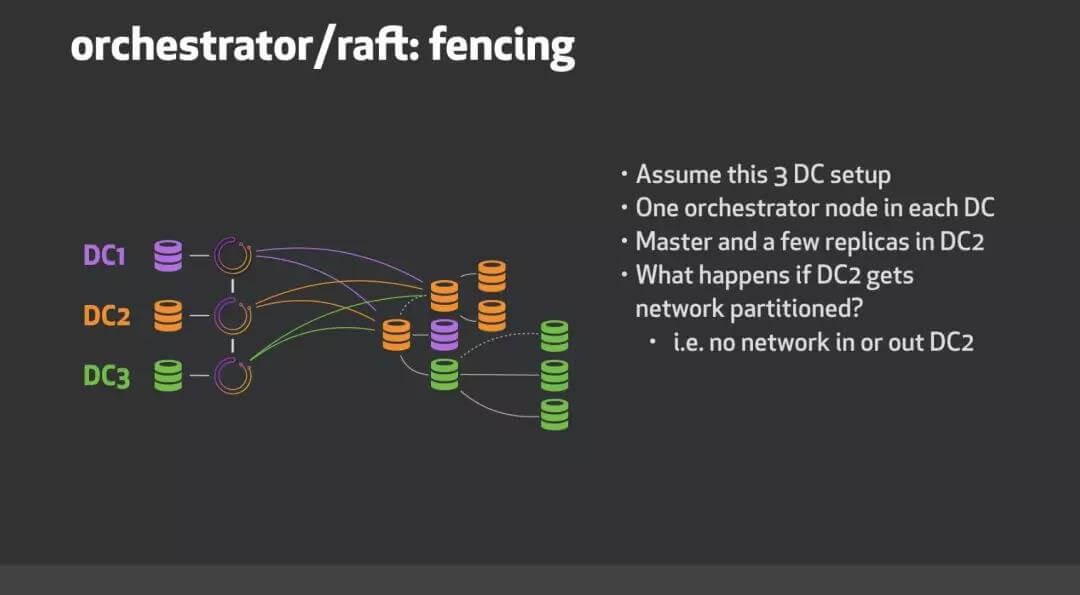
当DC2网络隔离时会发生什么?
roadmap
进行中以及待做事项:- 故障检测需要仲裁协议(即,DeadMaster需要由多个orchestrator节点进行分析)才能启动故障转移/恢复。
- 支持探测共享(与上述互斥):leader将划分服务器列表以在所有节点之间进行探测,潜在地可以通过数据中心来划分。这将减少探测负载(每个MySQL服务器将由单个节点而不是所有节点探测)。所有orchestrator节点将看到相同的画像,而不是各自独立的视图。
- 发表于 2019-11-27 12:46
- 阅读 ( 61 )
