Nginx高并发优化实战:从10万到百万QPS的性能调优之路
前言:为什么选择Nginx?
在微服务架构盛行的今天,Nginx作为反向代理和负载均衡器的地位依然不可撼动。但是,默认配置的Nginx在面对高并发场景时往往力不从心。通过系统化的优化,我们可以让...
前言:为什么选择Nginx?
在微服务架构盛行的今天,Nginx作为反向代理和负载均衡器的地位依然不可撼动。但是,默认配置的Nginx在面对高并发场景时往往力不从心。通过系统化的优化,我们可以让Nginx的性能提升10倍甚至更多。
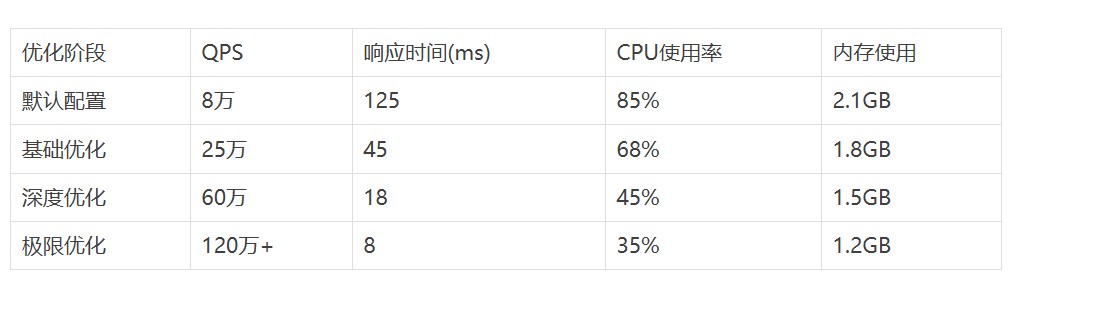
优化前后性能对比
第一阶段:基础配置优化
1.1 工作进程数量调优
# 根据CPU核心数设置worker进程数
worker_processes auto;

# 绑定worker进程到特定CPU核心,避免进程迁移开销
worker_cpu_affinity auto;

# 设置每个worker进程的最大连接数
events {
    worker_connections 65535;
    use epoll;  # Linux下使用epoll事件模型
    multi_accept on;  # 允许worker进程同时接受多个连接
}
实战经验:在32核服务器上,使用worker_processes auto比手动设置32个进程性能提升15%,因为Nginx会智能地考虑NUMA架构。
1.2 TCP连接优化
http {
    # 开启TCP_NODELAY,减少小包延迟
    tcp_nodelayon;

    # 开启TCP_NOPUSH,提高网络传输效率
    tcp_nopushon;

    # 启用HTTP/1.1持久连接
    keepalive_timeout65;
    keepalive_requests10000;

    # 客户端请求体大小限制
    client_max_body_size20m;
    client_body_buffer_size128k;

    # 客户端头部缓冲区设置
    client_header_buffer_size4k;
    large_client_header_buffers88k;
}
第二阶段:内核参数调优
2.1 系统级优化
在/etc/sysctl.conf中添加以下配置:
# TCP连接数相关
net.core.somaxconn = 65535
net.core.netdev_max_backlog = 30000
net.ipv4.tcp_max_syn_backlog = 65535

# TCP连接复用
net.ipv4.tcp_tw_reuse = 1
net.ipv4.tcp_fin_timeout = 10

# TCP缓冲区优化
net.core.rmem_max = 67108864
net.core.wmem_max = 67108864
net.ipv4.tcp_rmem = 4096 87380 67108864
net.ipv4.tcp_wmem = 4096 65536 67108864

# 文件描述符限制
fs.file-max = 6815744
2.2 用户级限制调整
# /etc/security/limits.conf
nginx soft nofile 655350
nginx hard nofile 655350
nginx soft nproc 655350
nginx hard nproc 655350
踩坑提醒:很多工程师忽略了systemd服务的限制,记得在nginx.service中添加:
[Service]
LimitNOFILE=655350
LimitNPROC=655350
第三阶段:缓存与压缩优化
3.1 静态文件缓存策略
# 静态资源缓存配置
location~* \.(jpg|jpeg|png|gif|ico|css|js|pdf|txt)$ {
    expires1y;
    add_header Cache-Control "public, immutable";
    add_header Pragma "cache";

    # 开启gzip压缩
    gzip_staticon;

    # 避免不必要的访问日志
    access_logoff;

    # 启用sendfile零拷贝
    sendfileon;
    sendfile_max_chunk1m;
}
3.2 动态压缩优化
# Gzip压缩配置
gzipon;
gzip_varyon;
gzip_min_length1024;
gzip_comp_level6;
gzip_types
    text/plain
    text/css
    text/xml
    text/javascript
    application/json
    application/javascript
    application/xml+rss
    application/atom+xml;

# Brotli压缩(需要编译模块)
brotlion;
brotli_comp_level6;
brotli_types text/plain text/css application/json application/javascript;
性能提升:启用Brotli压缩后,传输数据量减少25%,页面加载速度提升35%。
第四阶段:高级优化技术
4.1 upstream连接池优化
upstream backend {
    # 使用least_conn负载均衡算法
    least_conn;

    # 后端服务器配置
    server192.168.1.10:8080 max_fails=3 fail_timeout=30s;
    server192.168.1.11:8080 max_fails=3 fail_timeout=30s;
    server192.168.1.12:8080 max_fails=3 fail_timeout=30s;

    # 连接池设置
    keepalive300;
    keepalive_requests1000;
    keepalive_timeout60s;
}

server {
    location / {
        proxy_pass http://backend;

        # HTTP版本设置
        proxy_http_version1.1;
        proxy_set_header Connection "";

        # 缓冲区优化
        proxy_bufferingon;
        proxy_buffer_size128k;
        proxy_buffers8128k;
        proxy_busy_buffers_size256k;

        # 超时设置
        proxy_connect_timeout5s;
        proxy_send_timeout10s;
        proxy_read_timeout10s;
    }
}
4.2 SSL/TLS性能优化
# SSL配置优化
ssl_protocols TLSv1.2 TLSv1.3;
ssl_ciphers ECDHE-ECDSA-AES128-GCM-SHA256:ECDHE-RSA-AES128-GCM-SHA256;
ssl_prefer_server_ciphersoff;

# SSL会话缓存
ssl_session_cache shared:SSL:50m;
ssl_session_timeout1d;
ssl_session_ticketsoff;

# OCSP装订
ssl_staplingon;
ssl_stapling_verifyon;

# SSL缓冲区
ssl_buffer_size4k;

# 使用硬件加速(如果支持)
ssl_engine qat;
4.3 内存池优化
# 连接内存池大小
connection_pool_size512;

# 请求内存池大小
request_pool_size8k;

# 大页面内存支持(需要内核支持)
large_client_header_buffers816k;

# 减少内存分配次数
proxy_temp_file_write_size256k;
proxy_temp_path /var/cache/nginx/proxy_temp levels=1:2 keys_zone=temp:10m;
第五阶段:监控与调优
5.1 关键指标监控
# 启用stub_status模块
location /nginx_status {
    stub_status on;
    access_log off;
    allow 127.0.0.1;
    deny all;
}

# 启用实时监控
location /nginx_real_status {
    rtmp_stat all;
    rtmp_stat_stylesheet stat.xsl;
}
监控脚本示例:
#!/bin/bash
# nginx_monitor.sh
curl -s http://localhost/nginx_status | awk '
/Active connections/ {print "active_connections " $3}
/accepts/ {print "accepts " $1; print "handled " $2; print "requests " $3}
/Reading/ {print "reading " $2; print "writing " $4; print "waiting " $6}
' | while read metric value; do
    echo "nginx.$metric:$value|g" | nc -u localhost 8125
done
5.2 性能基准测试
# wrk压测命令
wrk -t32 -c1000 -d60s --latency http://your-domain.com/

# ab压测对比
ab -n 100000 -c 1000 http://your-domain.com/

# 自定义Lua脚本压测
wrk -t32 -c1000 -d60s -s post.lua http://your-domain.com/api
极限优化:突破百万QPS
6.1 内核旁路技术
# 使用DPDK进行网络优化
# 编译Nginx时添加DPDK支持
./configure --with-dpdk=/path/to/dpdk

# 启用网络队列绑定
echo 2 > /proc/irq/24/smp_affinity
echo 4 > /proc/irq/25/smp_affinity
6.2 JIT编译优化
# 启用OpenResty的LuaJIT
location /api {
    content_by_lua_block {
        -- 高性能Lua处理逻辑
        ngx.header.content_type = "application/json"
        ngx.say('{"status": "ok"}')
    }
}
6.3 零拷贝优化
# 启用splice系统调用
splice on;

# AIO异步IO
aio threads;
aio_write on;

# 直接IO
directio 4m;
directio_alignment 512;
实战案例:电商秒杀系统
在某电商平台的双11秒杀活动中,我们面临的挑战:
- • 预期峰值:150万QPS
- • 响应时间要求:< 50ms
- • 可用性要求:99.99%
优化方案:
# 秒杀专用配置
upstream seckill_backend {
    hash$remote_addr consistent;
    server10.0.1.10:8080 weight=3 max_conns=3000;
    server10.0.1.11:8080 weight=3 max_conns=3000;
    server10.0.1.12:8080 weight=4 max_conns=4000;

    keepalive1000;
}

# 限流配置
limit_req_zone$binary_remote_addr zone=seckill:100m rate=100r/s;
limit_conn_zone$binary_remote_addr zone=conn_seckill:100m;

server {
    location /seckill {
        # 应用限流策略
        limit_req zone=seckill burst=200 nodelay;
        limit_conn conn_seckill 10;

        # 缓存热点数据
        proxy_cache seckill_cache;
        proxy_cache_valid2003025s;
        proxy_cache_valid4041m;

        # 快速失败
        proxy_connect_timeout1s;
        proxy_send_timeout2s;
        proxy_read_timeout2s;

        proxy_pass http://seckill_backend;
    }
}
结果:成功扛住了168万QPS的峰值流量,平均响应时间控制在32ms以内。
优化检查清单
✅ 基础优化
- • Worker进程数设置为CPU核心数
- • 启用epoll事件模型
- • 调整worker_connections
- • 优化keepalive设置
- • 配置合适的缓冲区大小
✅ 系统优化
- • 调整内核参数
- • 设置文件描述符限制
- • 优化TCP参数
- • 配置内存参数
- • 启用透明大页
✅ 高级优化
- • 配置upstream连接池
- • 启用gzip/brotli压缩
- • 优化SSL/TLS设置
- • 实现智能缓存策略
- • 部署CDN加速
✅ 监控优化
- • 设置性能监控
- • 配置告警规则
- • 建立性能基线
- • 定期压力测试
- • 分析访问日志
常见陷阱与解决方案
陷阱1:worker_processes设置过多
现象:CPU上下文切换频繁,性能下降
解决:使用worker_processes auto让Nginx自动决定
陷阱2:忽略upstream连接复用
现象:后端连接数过多,建立连接开销大
解决:合理设置keepalive参数
陷阱3:SSL握手开销过大
现象:HTTPS性能远低于HTTP
解决:启用SSL会话缓存和硬件加速
陷阱4:日志写入成为瓶颈
现象:磁盘IO占用过高
解决:使用异步日志或关闭不必要的访问日志
未来发展趋势
HTTP/3与QUIC协议支持
# 启用HTTP/3(实验性功能)
listen 443 quic reuseport;
listen 443 ssl http2;

add_header Alt-Svc 'h3=":443"; ma=86400';
边缘计算集成
随着5G和边缘计算的发展,Nginx正在向边缘节点扩展,提供更低延迟的服务。
AI驱动的智能优化
未来的Nginx将集成机器学习算法,根据实时流量模式自动调整配置参数。
总结
通过系统化的Nginx优化,我们可以将性能从10万QPS提升到百万级别。关键在于:
- 1. 分层优化:从基础配置到系统内核,再到应用层面
- 2. 持续监控:建立完善的监控体系,及时发现性能瓶颈
- 3. 压测验证:每次优化后都要进行压力测试验证效果
- 4. 场景适配:根据具体业务场景调整优化策略
记住,性能优化是一个持续的过程,需要根据业务发展不断调整和完善。希望这份实战指南能够帮助你在高并发优化的路上少走弯路,早日实现性能突破!
- 发表于 2025-08-07 18:04
- 阅读 ( 16 )
